自定义WebGl打包模板【Unity 2021.3.2】_universal webgl template 1.3-程序员宅基地
目录
演示:
未修改: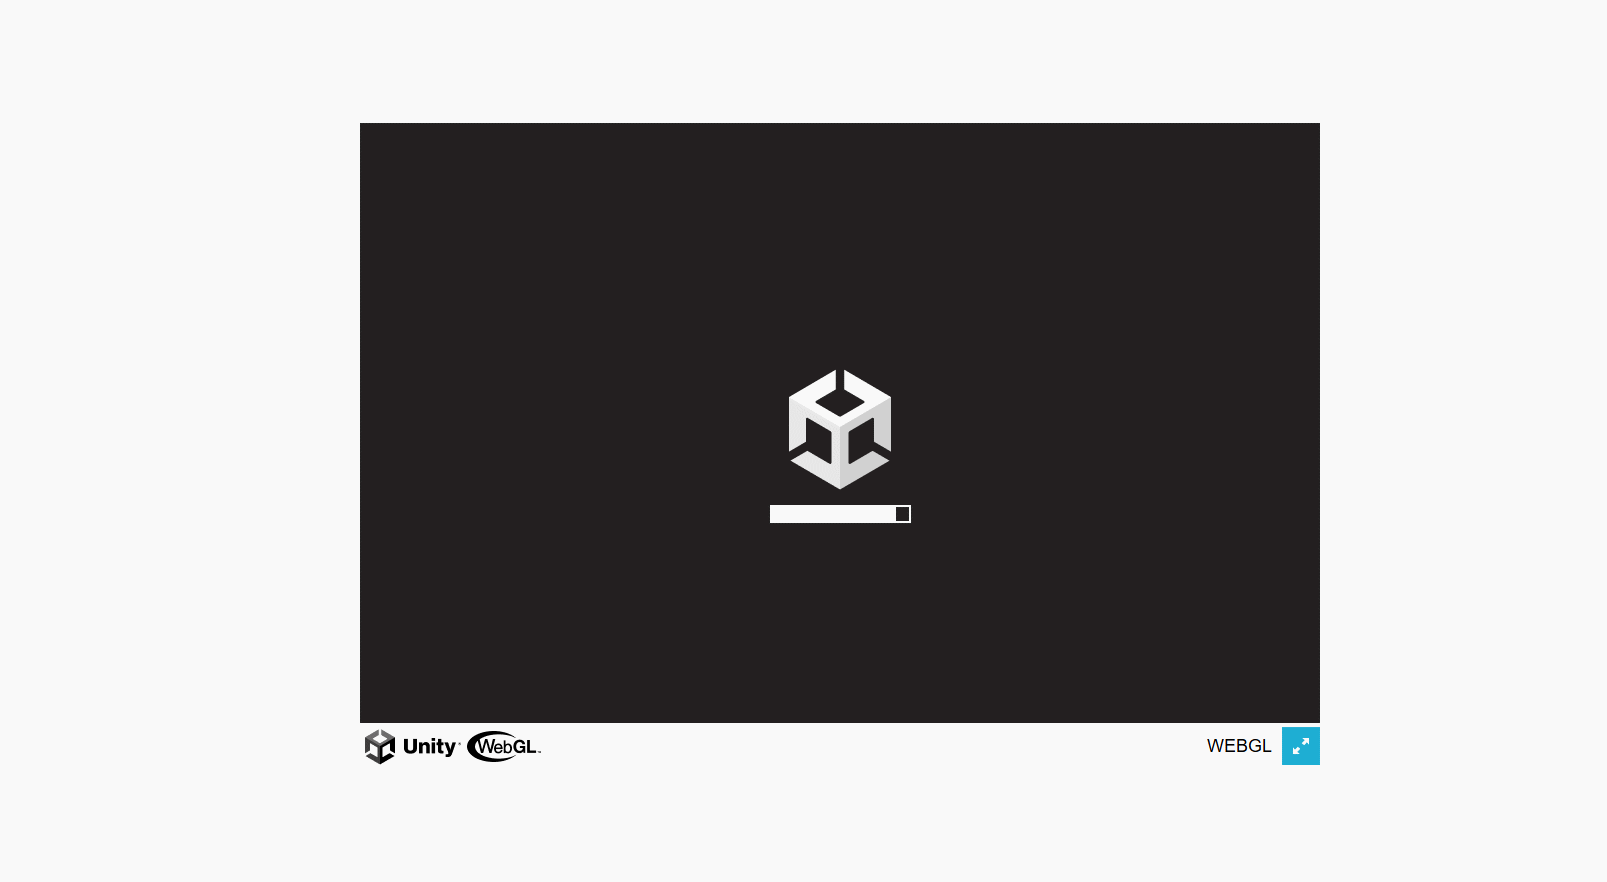
修改后: 
一、获取Unity 自带模板
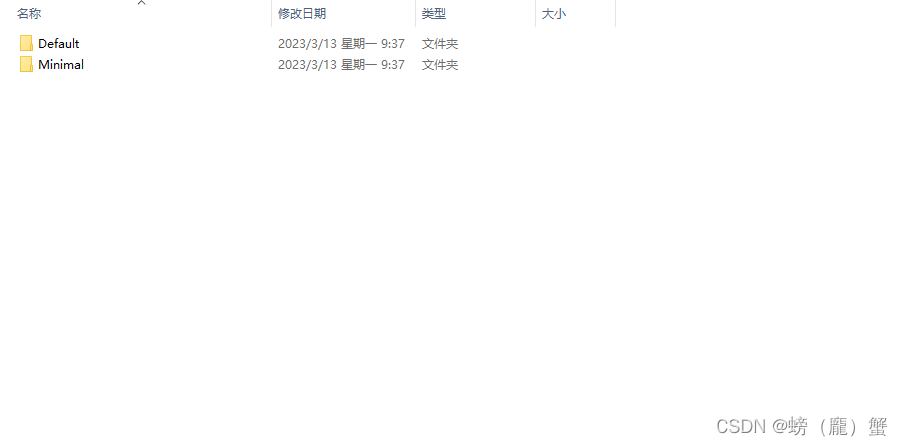
1.路径:
Unity安装路径下\Editor\Data\PlaybackEngines\WebGLSupport\BuildTools\WebGLTemplates
2.模板选择:
分别有 Default 和 Minimal 两个自带模板【Minimal 模板比较简洁什么都没有,这里选择Default,因为有进度条】
3.Unity 查看模板:
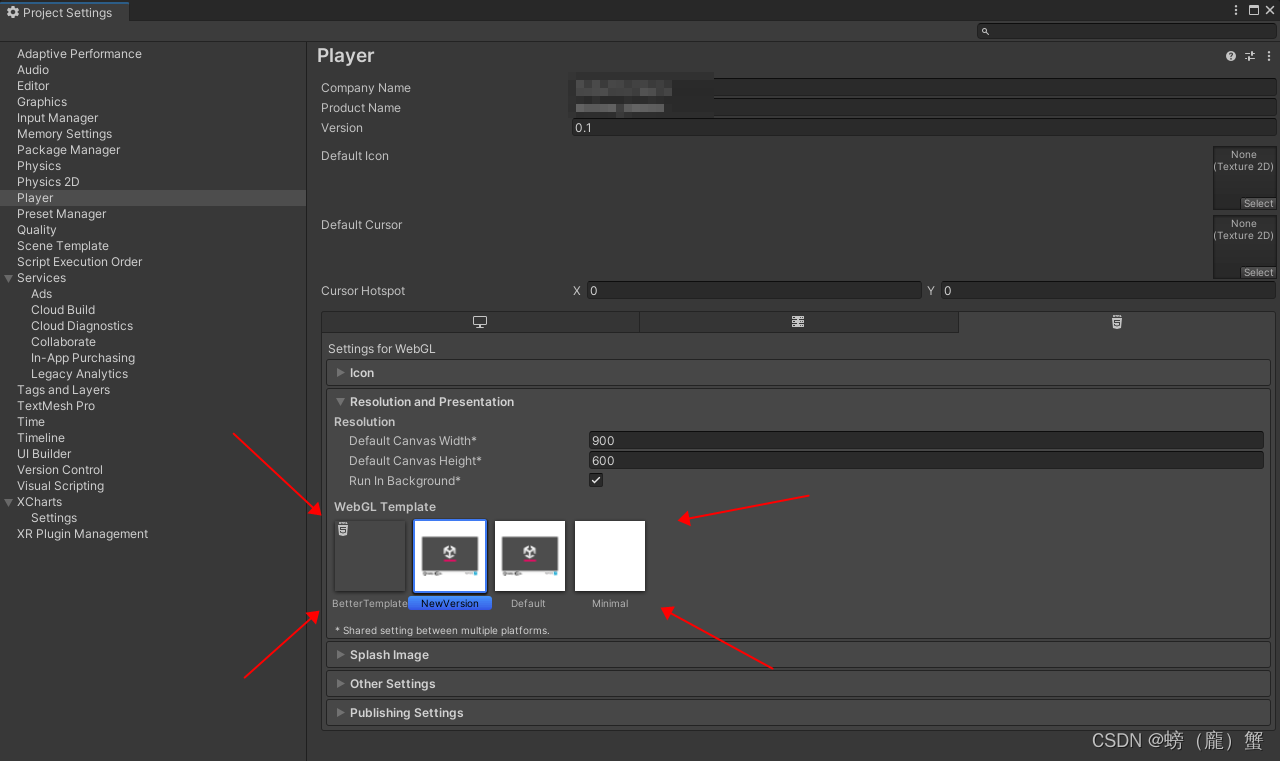
可以在 Project Settings -> Player -> Resolution add Presentation 查看 模板
二.导入Unity
1.创建模板
在 Unity Project 面板下创建 WebGLTemplates 文件夹【很重要】,在 WebGLTemplates 下创建的文件夹就是 在 Resolution add Presentation 下显示的名字【创建好后,就会出现模板】,红色箭头代表对应关系

2.模板文件说明:
TemplateData 文件夹:启动界面的进度条、图标等一些UI 。还有一个style.css文件【控制位置和一些图片引用】
-------------------------------------------------------------------------------------------------------------------------
index.html :为网页模板【很重要】
-------------------------------------------------------------------------------------------------------------------------
thumbnail.png:在Resolution add Presentation下显示的缩略图
三.修改模板
1.删除网页多余图片
HTML:
打开模板中 index.html 文件【下方为未修改的文件】
<!DOCTYPE html>
<html lang="en-us">
  <head>
    <meta charset="utf-8">
    <meta http-equiv="Content-Type" content="text/html; charset=utf-8">
    <title>Unity WebGL Player | {
   {
   { PRODUCT_NAME }}}</title>
    <link rel="shortcut icon" href="TemplateData/favicon.ico">
    <link rel="stylesheet" href="TemplateData/style.css">
  </head>
  <body>
    <div id="unity-container" class="unity-desktop">
      <canvas id="unity-canvas" width={
   {
   { WIDTH }}} height={
   {
   { HEIGHT }}}></canvas>
      <div id="unity-loading-bar">
        <div id="unity-logo"></div>
        <div id="unity-progress-bar-empty">
          <div id="unity-progress-bar-full"></div>
        </div>
      </div>
      <div id="unity-warning"> </div>
      <div id="unity-footer">
        <div id="unity-webgl-logo"></div>
        <div id="unity-fullscreen-button"></div>
        <div id="unity-build-title">{
   {
   { PRODUCT_NAME }}}</div>
      </div>
    </div>
    <script>
      var container = document.querySelector("#unity-container");
      var canvas = document.querySelector("#unity-canvas");
      var loadingBar = document.querySelector("#unity-loading-bar");
      var progressBarFull = document.querySelector("#unity-progress-bar-full");
      var fullscreenButton = document.querySelector("#unity-fullscreen-button");
      var warningBanner = document.querySelector("#unity-warning");

      // Shows a temporary message banner/ribbon for a few seconds, or
      // a permanent error message on top of the canvas if type=='error'.
      // If type=='warning', a yellow highlight color is used.
      // Modify or remove this function to customize the visually presented
      // way that non-critical warnings and error messages are presented to the
      // user.
      function unityShowBanner(msg, type) {
        function updateBannerVisibility() {
          warningBanner.style.display = warningBanner.children.length ? 'block' : 'none';
        }
        var div = document.createElement('div');
        div.innerHTML = msg;
        warningBanner.appendChild(div);
        if (type == 'error') div.style = 'background: red; padding: 10px;';
        else {
          if (type == 'warning') div.style = 'background: yellow; padding: 10px;';
          setTimeout(function() {
            warningBanner.removeChild(div);
            updateBannerVisibility();
          }, 5000);
        }
        updateBannerVisibility();
      }

      var buildUrl = "Build";
      var loaderUrl = buildUrl + "/{
   {
   { LOADER_FILENAME }}}";
      var config = {
        dataUrl: buildUrl + "/{
   {
   { DATA_FILENAME }}}",
        frameworkUrl: buildUrl + "/{
   {
   { FRAMEWORK_FILENAME }}}",
#if USE_WASM
        codeUrl: buildUrl + "/{
   {
   { CODE_FILENAME }}}",
#endif
#if MEMORY_FILENAME
        memoryUrl: buildUrl + "/{
   {
   { MEMORY_FILENAME }}}",
#endif
#if SYMBOLS_FILENAME
        symbolsUrl: buildUrl + "/{
   {
   { SYMBOLS_FILENAME }}}",
#endif
        streamingAssetsUrl: "StreamingAssets",
        companyName: {
   {
   { JSON.stringify(COMPANY_NAME) }}},
        productName: {
   {
   { JSON.stringify(PRODUCT_NAME) }}},
        productVersion: {
   {
   { JSON.stringify(PRODUCT_VERSION) }}},
        showBanner: unityShowBanner,
      };

      // By default Unity keeps WebGL canvas render target size matched with
      // the DOM size of the canvas element (scaled by window.devicePixelRatio)
      // Set this to false if you want to decouple this synchronization from
      // happening inside the engine, and you would instead like to size up
      // the canvas DOM size and WebGL render target sizes yourself.
      // config.matchWebGLToCanvasSize = false;

      if (/iPhone|iPad|iPod|Android/i.test(navigator.userAgent)) {
        // Mobile device style: fill the whole browser client area with the game canvas:

        var meta = document.createElement('meta');
        meta.name = 'viewport';
        meta.content = 'width=device-width, height=device-height, initial-scale=1.0, user-scalable=no, shrink-to-fit=yes';
        document.getElementsByTagName('head')[0].appendChild(meta);
        container.className = "unity-mobile";

        // To lower canvas resolution on mobile devices to gain some
        // performance, uncomment the following line:
        // config.devicePixelRatio = 1;

        canvas.style.width = window.innerWidth + 'px';
        canvas.style.height = window.innerHeight + 'px';

        unityShowBanner('WebGL builds are not supported on mobile devices.');
      } else {
        // Desktop style: Render the game canvas in a window that can be maximized to fullscreen:

        canvas.style.width = "{
   {
   { WIDTH }}}px";
        canvas.style.height = "{
   {
   { HEIGHT }}}px";
      }

#if BACKGROUND_FILENAME
      canvas.style.background = "url('" + buildUrl + "/{
   {
   { BACKGROUND_FILENAME.replace(/'/g, '%27') }}}') center / cover";
#endif
      loadingBar.style.display = "block";

      var script = document.createElement("script");
      script.src = loaderUrl;
      script.onload = () => {
        createUnityInstance(canvas, config, (progress) => {
          progressBarFull.style.width = 100 * progress + "%";
        }).then((unityInstance) => {
          loadingBar.style.display = "none";
          fullscreenButton.onclick = () => {
            unityInstance.SetFullscreen(1);
          };
        }).catch((message) => {
          alert(message);
        });
      };
      document.body.appendChild(script);
    </script>
  </body>
</html>
【删除第 31、23 行 代码】:
第31行,这里引用了CSS里面的图片样式,最后会直接显示在打包好的WebGl程序中。【下方为需要删除的代码,全屏的按钮】
【注】在当前脚本中会有这些代码的引用记得删掉【按钮的绑定事件】
-------------------------------------------------------------------------------------------------------------------------
第23行,会获取 Unity 里的 Product Name 显示在打包程序上,所以删掉
  31行  -    var fullscreenButton = document.querySelector("#unity-fullscreen-button");
  23行  -    <div id="unity-build-title">{
   {
   { PRODUCT_NAME }}}</div>
CSS:
CSS文件在 TemplateData 文件夹下【下方为原代码】
body { padding: 0; margin: 0 }
#unity-container { position: absolute }
#unity-container.unity-desktop { left: 50%; top: 50%; transform: translate(-50%, -50%) }
#unity-container.unity-mobile { width: 100%; height: 100% }
#unity-canvas { background: {
   {
   { BACKGROUND_COLOR }}} }
.unity-mobile #unity-canvas { width: 100%; height: 100% }
#unity-loading-bar { position: absolute; left: 50%; top: 50%; transform: translate(-50%, -50%); display: none }
#unity-logo { width: 154px; height: 130px; background: url('unity-logo-{
   {
   { SPLASH_SCREEN_STYLE.toLowerCase() }}}.png') no-repeat center }
#unity-progress-bar-empty { width: 141px; height: 18px; margin-top: 10px; margin-left: 6.5px; background: url('progress-bar-empty-{
   {
   { SPLASH_SCREEN_STYLE.toLowerCase() }}}.png') no-repeat center }
#unity-progress-bar-full { width: 0%; height: 18px; margin-top: 10px; background: url('progress-bar-full-{
   {
   { SPLASH_SCREEN_STYLE.toLowerCase() }}}.png') no-repeat center }
#unity-footer { position: relative }
.unity-mobile #unity-footer { display: none }
#unity-webgl-logo { float:left; width: 204px; height: 38px; background: url('webgl-logo.png') no-repeat center }
#unity-build-title { float: right; margin-right: 10px; line-height: 38px; font-family: arial; font-size: 18px }
#unity-fullscreen-button { float: right; width: 38px; height: 38px; background: url('fullscreen-button.png') no-repeat center }
#unity-warning { position: absolute; left: 50%; top: 5%; transform: translate(-50%); background: white; padding: 10px; display: none }
删除掉 第 8、13、14、15行代码 【刚刚在后缀 HTML,脚本里删掉了全屏的按钮,这里的引用也就没有用了,所以删掉【第15行】 】
剩下的就是一些显示的Logo 和 图片什么的【所以也删掉,不然会影响全屏,比如打包后会出现滑动条】
2.全屏、适配浏览器大小:
在未修改文件的第 106 - 107 行:【vh、vw 在HTML里代表视口】注意位置别找错
 canvas.style.width = "{
   {
   { WIDTH }}}px";
 canvas.style.height = "{
   {
   { HEIGHT }}}px";
修改为:
canvas.style.width = "100vw";
canvas.style.height = "98vh";
四、进度条:
经过上面修改打包出来的效果如下:

打开 TemplateData 文件夹: 图片只保留 【progress-bar-empty-dark】和【progress-bar-full-dark】进度条,剩下图片都不需要【注】这里删的都是图片
-------------------------------------------------------------------------------------------------------------------------
图片我做了修改【黑色图上面有一张白色图】


CSS:
这里只修改
#unity-progress-bar-empty { width: 141px; height: 18px; margin-top: 10px; margin-left: 6.5px; background: url('progress-bar-empty-{
   {
   { SPLASH_SCREEN_STYLE.toLowerCase() }}}.png') no-repeat center }
#unity-progress-bar-full { width: 0%; height: 18px; margin-top: 10px; background: url('progress-bar-full-{
   {
   { SPLASH_SCREEN_STYLE.toLowerCase() }}}.png') no-repeat center }
修改为:
#unity-progress-bar-empty { width: 564px; height: 18px; margin-top: 500px; margin-left: 6.5px; background: url('progress-bar-empty-{
   {
   { SPLASH_SCREEN_STYLE.toLowerCase() }}}.png') no-repeat  }
#unity-progress-bar-full { width: 0%; height: 18px; margin-top: 502px; background: url('progress-bar-full-{
   {
   { SPLASH_SCREEN_STYLE.toLowerCase() }}}.png') no-repeat  }
unity-progress-bar-empty:为底图
unity-progress-bar-full :进度条
-------------------------------------------------------------------------------------------------------------------------
将底图的 Width 修改为 564px【制作的地图宽】margin-top 修改为500px【将进度条放在下方】,将最后的 center 删掉
进度条 的 margin-top 修改为500px【因为修改的图片关系】,代码最后面的 center 也删掉
五、完成

但是发现进度条没有走完
HTML:
未修改:
第 9、10行代表给滑动条赋值。
第 13 行代表 进度条消失
#if BACKGROUND_FILENAME
      canvas.style.background = "url('" + buildUrl + "/{
   {
   { BACKGROUND_FILENAME.replace(/'/g, '%27') }}}') center / cover";
#endif
      loadingBar.style.display = "block";

      var script = document.createElement("script");
      script.src = loaderUrl;
      script.onload = () => {
        createUnityInstance(canvas, config, (progress) => {
            progressBarFull.style.width = 100 * progress + "%";

        }).then((unityInstance) => {
          loadingBar.style.display = "none";

        }).catch((message) => {
          alert(message);
        });
      };
      document.body.appendChild(script);
修改后:
在第 13 行 添加 Html 代码 【500代表 0.5秒后执行】
setTimeout(function ()
{
   loadingBar.style.display = "none";
}, 500);
注意第 12 - 14 行
#if BACKGROUND_FILENAME
      canvas.style.background = "url('" + buildUrl + "/{
   {
   { BACKGROUND_FILENAME.replace(/'/g, '%27') }}}') center / cover";
#endif
      loadingBar.style.display = "block";

      var script = document.createElement("script");
      script.src = loaderUrl;
      script.onload = () => {
        createUnityInstance(canvas, config, (progress) => {
          progressBarFull.style.width = 100 * progress + "%";
        }).then((unityInstance) => {
            setTimeout(function () {
                loadingBar.style.display = "none";
            }, 500);
        }).catch((message) => {
          alert(message);
        });
      };
      document.body.appendChild(script);
智能推荐
艾美捷Epigentek DNA样品的超声能量处理方案-程序员宅基地
文章浏览阅读15次。空化气泡的大小和相应的空化能量可以通过调整完全标度的振幅水平来操纵和数字控制。通过强调超声技术中的更高通量处理和防止样品污染,Epigentek EpiSonic超声仪可以轻松集成到现有的实验室工作流程中,并且特别适合与表观遗传学和下一代应用的兼容性。Epigentek的EpiSonic已成为一种有效的剪切设备,用于在染色质免疫沉淀技术中制备染色质样品,以及用于下一代测序平台的DNA文库制备。该装置的经济性及其多重样品的能力使其成为每个实验室拥有的经济高效的工具,而不仅仅是核心设施。
11、合宙Air模块Luat开发:通过http协议获取天气信息_合宙获取天气-程序员宅基地
文章浏览阅读4.2k次,点赞3次,收藏14次。目录点击这里查看所有博文 本系列博客,理论上适用于合宙的Air202、Air268、Air720x、Air720S以及最近发布的Air720U(我还没拿到样机,应该也能支持)。 先不管支不支持,如果你用的是合宙的模块,那都不妨一试,也许会有意外收获。 我使用的是Air720SL模块,如果在其他模块上不能用,那就是底层core固件暂时还没有支持,这里的代码是没有问题的。例程仅供参考!..._合宙获取天气
EasyMesh和802.11s对比-程序员宅基地
文章浏览阅读7.7k次,点赞2次,收藏41次。1 关于meshMesh的意思是网状物,以前读书的时候,在自动化领域有传感器自组网,zigbee、蓝牙等无线方式实现各个网络节点消息通信,通过各种算法,保证整个网络中所有节点信息能经过多跳最终传递到目的地,用于数据采集。十多年过去了,在无线路由器领域又把这个mesh概念翻炒了一下,各大品牌都推出了mesh路由器,大多数是3个为一组,实现在面积较大的住宅里,增强wifi覆盖范围,智能在多热点之间切换,提升上网体验。因为节点基本上在3个以内,所以mesh的算法不必太复杂,组网形式比较简单。各厂家都自定义了组_802.11s
线程的几种状态_线程状态-程序员宅基地
文章浏览阅读5.2k次,点赞8次,收藏21次。线程的几种状态_线程状态
stack的常见用法详解_stack函数用法-程序员宅基地
文章浏览阅读4.2w次,点赞124次,收藏688次。stack翻译为栈,是STL中实现的一个后进先出的容器。要使用 stack,应先添加头文件include<stack>,并在头文件下面加上“ using namespacestd;"1. stack的定义其定义的写法和其他STL容器相同, typename可以任意基本数据类型或容器:stack<typename> name;2. stack容器内元素的访问..._stack函数用法
2018.11.16javascript课上随笔(DOM)-程序员宅基地
文章浏览阅读71次。<li> <a href = "“#”>-</a></li><li>子节点:文本节点(回车),元素节点,文本节点。不同节点树: 节点(各种类型节点)childNodes:返回子节点的所有子节点的集合,包含任何类型、元素节点(元素类型节点):child。node.getAttribute(at...
随便推点
layui.extend的一点知识 第三方模块base 路径_layui extend-程序员宅基地
文章浏览阅读3.4k次。//config的设置是全局的layui.config({ base: '/res/js/' //假设这是你存放拓展模块的根目录}).extend({ //设定模块别名 mymod: 'mymod' //如果 mymod.js 是在根目录,也可以不用设定别名 ,mod1: 'admin/mod1' //相对于上述 base 目录的子目录}); //你也可以忽略 base 设定的根目录,直接在 extend 指定路径(主要:该功能为 layui 2.2.0 新增)layui.exten_layui extend
5G云计算:5G网络的分层思想_5g分层结构-程序员宅基地
文章浏览阅读3.2k次,点赞6次,收藏13次。分层思想分层思想分层思想-1分层思想-2分层思想-2OSI七层参考模型物理层和数据链路层物理层数据链路层网络层传输层会话层表示层应用层OSI七层模型的分层结构TCP/IP协议族的组成数据封装过程数据解封装过程PDU设备与层的对应关系各层通信分层思想分层思想-1在现实生活种,我们在喝牛奶时,未必了解他的生产过程,我们所接触的或许只是从超时购买牛奶。分层思想-2平时我们在网络时也未必知道数据的传输过程我们的所考虑的就是可以传就可以,不用管他时怎么传输的分层思想-2将复杂的流程分解为几个功能_5g分层结构
基于二值化图像转GCode的单向扫描实现-程序员宅基地
文章浏览阅读191次。在激光雕刻中,单向扫描(Unidirectional Scanning)是一种雕刻技术,其中激光头只在一个方向上移动,而不是来回移动。这种移动方式主要应用于通过激光逐行扫描图像表面的过程。具体而言,单向扫描的过程通常包括以下步骤:横向移动(X轴): 激光头沿X轴方向移动到图像的一侧。纵向移动(Y轴): 激光头沿Y轴方向开始逐行移动,刻蚀图像表面。这一过程是单向的,即在每一行上激光头只在一个方向上移动。返回横向移动: 一旦一行完成,激光头返回到图像的一侧,准备进行下一行的刻蚀。
算法随笔:强连通分量-程序员宅基地
文章浏览阅读577次。强连通:在有向图G中,如果两个点u和v是互相可达的,即从u出发可以到达v,从v出发也可以到达u,则成u和v是强连通的。强连通分量:如果一个有向图G不是强连通图,那么可以把它分成躲个子图,其中每个子图的内部是强连通的,而且这些子图已经扩展到最大,不能与子图外的任一点强连通,成这样的一个“极大连通”子图是G的一个强连通分量(SCC)。强连通分量的一些性质:(1)一个点必须有出度和入度,才会与其他点强连通。(2)把一个SCC从图中挖掉,不影响其他点的强连通性。_强连通分量
Django(2)|templates模板+静态资源目录static_django templates-程序员宅基地
文章浏览阅读3.9k次,点赞5次,收藏18次。在做web开发,要给用户提供一个页面,页面包括静态页面+数据,两者结合起来就是完整的可视化的页面,django的模板系统支持这种功能,首先需要写一个静态页面,然后通过python的模板语法将数据渲染上去。1.创建一个templates目录2.配置。_django templates
linux下的GPU测试软件,Ubuntu等Linux系统显卡性能测试软件 Unigine 3D-程序员宅基地
文章浏览阅读1.7k次。Ubuntu等Linux系统显卡性能测试软件 Unigine 3DUbuntu Intel显卡驱动安装,请参考:ATI和NVIDIA显卡请在软件和更新中的附加驱动中安装。 这里推荐: 运行后,F9就可评分,已测试显卡有K2000 2GB 900+分,GT330m 1GB 340+ 分,GT620 1GB 340+ 分,四代i5核显340+ 分,还有写博客的小盒子100+ 分。relaybot@re...