Android中PopupWindow的基本使用_安卓 实现 显示在某个控件下面的浮动框-程序员宅基地
技术标签: 弹出窗口 滑动popupwindow PopuWindown和Listview Android基础知识 LayoutInflater PopupWindow
PopupWindow在界面弹出一窗口,效果相信大家常常看到,不废话,下面代码,有简单的先来。
分三种使用方式:
1.直接相对某个控件弹出
实现代码:
布局:popu_bg.xml
<LinearLayout xmlns:android="http://schemas.android.com/apk/res/android"
    xmlns:tools="http://schemas.android.com/tools"
    android:layout_width="100dp"
    android:layout_height="wrap_content"
    android:background="@drawable/aa" >
    <LinearLayout
        android:id="@+id/show"
        android:layout_width="match_parent"
        android:layout_height="wrap_content"
        android:gravity="center_vertical"
        android:orientation="vertical" >
        <TextView
            android:id="@+id/menu_start_chart"
            android:layout_width="match_parent"
            android:layout_height="wrap_content"
            android:gravity="center"
            android:text="item1"
            android:textColor="@android:color/white"
            android:textSize="15sp" />
        <View
            android:layout_width="match_parent"
            android:layout_height="1dp"
            android:background="#999999" />
        <TextView
            android:id="@+id/menu_scan"
            android:layout_width="match_parent"
            android:layout_height="wrap_content"
            android:gravity="center"
            android:text="item2"
            android:textColor="@android:color/white"
            android:textSize="15sp" />

        <View
            android:layout_width="match_parent"
            android:layout_height="1dp"
            android:background="#999999" />

        <TextView
            android:id="@+id/menu_scan"
            android:layout_width="match_parent"
            android:layout_height="wrap_content"
            android:gravity="center"
            android:text="item3"
            android:textColor="@android:color/white"
            android:textSize="15sp" />
    </LinearLayout>

</LinearLayout>
btn2=(Button)findViewById(R.id.btn2);
		btn2.setOnClickListener(new OnClickListener() {
			@Override
			public void onClick(View v) {
				showPopuwindown(v);
			}
		});
protected void showPopuwindown(View v) {
// TODO Auto-generated method stub
if(popupWindow==null){
infate=LayoutInflater.from(MainActivity.this);
view=infate.inflate(R.layout.popu_bg,null);
//创建PopupWindow构造函数,同时必须设置宽高参数,否则不显示
popupWindow = new PopupWindow(view, LayoutParams.WRAP_CONTENT,
LayoutParams.WRAP_CONTENT);
//初始化PopupWindow的View
popupWindow.setContentView(view);
}
//setFocusable设置PopupWindow的焦点
//如果PopupWindow中有Editor的话,focusable要为true
popupWindow.setFocusable(true);
popupWindow.setOutsideTouchable(true);
//想要让点击PopupWindow之外的地方PopupWindow消失你需要
//调用setBackgroundDrawable(new BitmapDrawable());
popupWindow.setBackgroundDrawable(new BitmapDrawable());
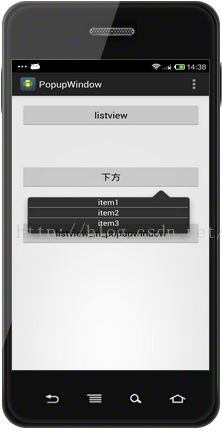
//在btn2下面显示
popupWindow.showAsDropDown(btn2);
popupWindow.update();
}2.在弹出的PopupWindow里添加listview进行滑动效果
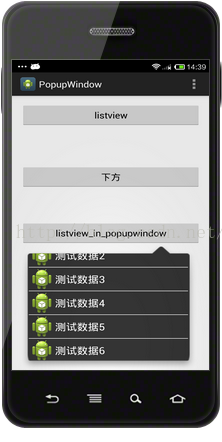
此效果点击按钮是弹出Popuwindow,内嵌一个listview,可以进行滑动,像微信右上角+一样,点击其中的item,Popuwindow消失,执行相应发操作,在这里一个toast提示。
布局代码:
<LinearLayout xmlns:android="http://schemas.android.com/apk/res/android"
    xmlns:tools="http://schemas.android.com/tools"
    android:layout_width="100dp"
    android:layout_height="140dp"
    android:background="@drawable/aa" >
    <ListView
        android:id="@+id/listview_bg"
        android:layout_width="match_parent"
        android:layout_height="wrap_content"
        android:divider="@android:color/white"
        android:dividerHeight="1dp"
         >
    </ListView>
</LinearLayout>
protected void showPopuwindownListview(View v) {
		// TODO Auto-generated method stub
		if(popupWindow1==null){
			LayoutInflater infate1=(LayoutInflater) getSystemService(Context.LAYOUT_INFLATER_SERVICE);
			listView=infate1.inflate(R.layout.listview_popu_bg,null);
			lv=(ListView)listView.findViewById(R.id.listview_bg);
			adapter=new MyAdater(MainActivity.this, getData());
			lv.setAdapter(adapter);
			popupWindow1 = new PopupWindow(listView);
			popupWindow1.setWidth(LayoutParams.WRAP_CONTENT);
			popupWindow1.setHeight(LayoutParams.WRAP_CONTENT);

			popupWindow1.setContentView(listView);
		}
		popupWindow1.setFocusable(true);
		popupWindow1.setOutsideTouchable(true);
		popupWindow1.setBackgroundDrawable(new BitmapDrawable());
		popupWindow1.showAsDropDown(btn3);
		popupWindow1.update();
		lv.setOnItemClickListener(new OnItemClickListener() {

			@Override
			public void onItemClick(AdapterView<?> parent, View view, int position, long id) {
				// TODO Auto-generated method stub
				Toast.makeText(MainActivity.this, adapter.getItem(position), Toast.LENGTH_SHORT).show();
				popupWindow1.dismiss();
			}
		});
	}

	 private List<String> getData(){

		  List<String> data = new ArrayList<String>();
         data.add("测试数据1");
         data.add("测试数据2");
         data.add("测试数据3");
         data.add("测试数据4");
         data.add("测试数据5");
         data.add("测试数据6");
         return data;
     }
class MyAdater extends BaseAdapter{
List<String> list=new ArrayList<String>();
public Context context;
private LayoutInflater infate;
public MyAdater(Context context,List<String> list) {
// TODO Auto-generated constructor stub
this.context=context;
this.list=list;
infate=LayoutInflater.from(context);
}
@Override
public int getCount() {
// TODO Auto-generated method stub
return list.size();
}
@Override
public String getItem(int position) {
// TODO Auto-generated method stub
return list.get(position);
}
@Override
public long getItemId(int position) {
// TODO Auto-generated method stub
return 0;
}
@Override
public View getView(int position, View convertView, ViewGroup parent) {
// TODO Auto-generated method stub
ViewHold hold=null;
if(convertView==null){
hold=new ViewHold();
convertView = infate.inflate(R.layout.item,null);
hold.tv=(TextView)convertView.findViewById(R.id.tv_name);
convertView.setTag(hold);
}
hold=(ViewHold) convertView.getTag();
hold.tv.setText(list.get(position));
return convertView;
}
class ViewHold{
ImageView iv;
TextView tv;
}
}3.在listview的点击每个item,在相应的item处弹出PopupWindow

QQ消息有这效果,长按消息列表中的每条信息,就会在此条消息上方弹出-置顶|删除
布局就是和2一样,listview+item,然后就是PopupWindow的布局
list_tip_menu.xml
<LinearLayout xmlns:android="http://schemas.android.com/apk/res/android"
    xmlns:tools="http://schemas.android.com/tools"
    android:layout_width="match_parent"
    android:layout_height="match_parent"
    android:gravity="center"
   >
    <LinearLayout
        android:id="@+id/w"
        android:layout_width="180dp"
        android:layout_height="60dp"
        android:gravity="center"
        android:orientation="vertical"
        android:background="#6d6d6d" >

        <TextView
            android:id="@+id/tip_show"
            android:layout_width="match_parent"
            android:layout_height="60dp"
            android:gravity="center"
            android:paddingLeft="5dp"
            android:paddingRight="5dp"
            android:text="测试数据w"
            android:textColor="@android:color/holo_orange_light"
            android:textSize="18sp" />
    </LinearLayout>

</LinearLayout>
protected void onCreate(Bundle savedInstanceState) {
super.onCreate(savedInstanceState);
setContentView(R.layout.activity_popuwindow);
lv=(ListView)findViewById(R.id.listview);
adapter=new MyAdater(this, getData());
lv.setAdapter(adapter);
lv.setOnItemLongClickListener(new OnItemLongClickListener() {
@Override
public boolean onItemLongClick(AdapterView<?> parent, View view, int position, long id) {
// TODO Auto-generated method stub
if(popupWindow==null){
infate=PopuwindowActivity.this.getLayoutInflater();
tipView =infate.inflate(R.layout.list_tip_menu, null);
tv=(TextView)tipView.findViewById(R.id.tip_show);
//PopupWindow(View contentView, int width, int height)
//contentView为要显示的view,
//width和height为宽和高,值为像素值,也可以是MATCHT_PARENT和WRAP_CONTENT
popupWindow=new PopupWindow(tipView, 200, 60);
}
tv.setText(adapter.getItem(position));
popupWindow.setFocusable(true);
popupWindow.setOutsideTouchable(true);
popupWindow.setBackgroundDrawable(new BitmapDrawable());
//相对view下方的位置,可以设置负值向相反方向移动,默认左上角为(0,0)
// popupWindow.showAsDropDown(view, view.getWidth()/2,0-(3*view.getHeight())/2 );
int[] location = new int[2];
view.getLocationOnScreen(location);
//在点击的item上方中间 view为item,根据view,popuWindown计算的他们的宽长,从而确定位置
popupWindow.showAtLocation(view, Gravity.NO_GRAVITY,
location[0]+view.getWidth()/2-popupWindow.getWidth()/2,
location[1]-popupWindow.getHeight());
//左方
// popupWindow.showAtLocation(view, Gravity.NO_GRAVITY, location[0]-popupWindow.getWidth(), location[1]);
//右边
//popupWindow.showAtLocation(view, Gravity.NO_GRAVITY, location[0]+v.getWidth(), location[1]);
popupWindow.update();
return true;
}
});
}
private List<String> getData() {
// TODO Auto-generated method stub
List<String> datas = new ArrayList<String>();
for (int i = 0; i < 100; i++) {
datas.add("test数据"+i);
}
return datas;
}1> LayoutInflater 实例的三种方式
1.LayoutInflater inflater = getLayoutInflater(); //调用Activity的getLayoutInflater()
2.LayoutInflater localinflater =(LayoutInflater)context.getSystemService(Context.LAYOUT_INFLATER_SERVICE);
3. LayoutInflater inflater = LayoutInflater.from(context);
 /**
     * Obtains the LayoutInflater from the given context.
     */
    public static LayoutInflater from(Context context) {
        LayoutInflater LayoutInflater =
                (LayoutInflater) context.getSystemService(Context.LAYOUT_INFLATER_SERVICE);
        if (LayoutInflater == null) {
            throw new AssertionError("LayoutInflater not found.");
        }
        return LayoutInflater;
    }
Activity 的 getLayoutInflater() 方法是调用 PhoneWindow 的getLayoutInflater()方法,源码:
public PhoneWindow(Context context) {
		   super(context);
		   mLayoutInflater = LayoutInflater.from(context);

		 }
所以最终本质都是调用的是 (LayoutInflater) context.getSystemService(Context.LAYOUT_INFLATER_SERVICE);
2>popupWindow = new PopupWindow(view, LayoutParams.WRAP_CONTENT,LayoutParams.WRAP_CONTENT);这里的 WRAP_CONTENT也可以换成MATCH_PARENT,或是具体数值,它指的是popuwindow的大小,也就是contentview的大小,注意popupwindow根据这个大小显示你的View,如果你的View本身是从xml得到的,那么xml的第一层view的大小属性将被忽略。所以这相当于popupWindow的width和height属性直接和第一层View相对应。
要设置具体数值,得额外在添加一层,如上布局LinearLayout中又加了LinearLayout进行宽高属性设置。
4.在3情况下,改下代码,在adapter中设置监听,添加一些方法:
在adapter中:
	@Override
	public View getView(int position, View convertView, ViewGroup parent) {
		// TODO Auto-generated method stub
		ViewHold hold=null;
		if(convertView==null){
			hold=new ViewHold();
			convertView = infate.inflate(R.layout.item,null);
			hold.tv=(TextView)convertView.findViewById(R.id.tv_name);
			convertView.setTag(hold);
		}
		hold=(ViewHold) convertView.getTag();
		hold.tv.setText(list.get(position));
		final String content = list.get(position);
		hold.tv.setOnLongClickListener(new OnLongClickListener() {
			@Override
			public boolean onLongClick(View v) {
				// TODO Auto-generated method stub
				if(onPressLongItemClik!=null){
					onPressLongItemClik.longPress(v,content);
					return true;
				}
				return false;
			}
		});
		return convertView;
	}
	public void setOnPressLongItemClik(OnPressLongItemClik onPressLongItemClik){
		this.onPressLongItemClik=onPressLongItemClik;
	}
	interface OnPressLongItemClik{
		void longPress(View view,String conttent);
	}
public class PopuwindowActivity1 extends Activity implements OnPressLongItemClik {

	private Button btn11;
	private ListView lv;
	private MyAdater1 adapter;
	private LayoutInflater infate;
	private View tipView;
	private PopupWindow popupWindow;
	private TextView tv;
	@Override
	protected void onCreate(Bundle savedInstanceState) {
		super.onCreate(savedInstanceState);
		setContentView(R.layout.activity_popuwindow);

		lv=(ListView)findViewById(R.id.listview);
		adapter=new MyAdater1(this, getData());
		//设置监听
		adapter.setOnPressLongItemClik(this);
		lv.setAdapter(adapter);
	}
	//实现接口
	@Override
	public void longPress(View view,String content) {
		// TODO Auto-generated method stub
		if(popupWindow==null){
			infate=PopuwindowActivity1.this.getLayoutInflater();
			tipView =infate.inflate(R.layout.list_tip_menu, null);
			tv=(TextView)tipView.findViewById(R.id.tip_show);
			//PopupWindow(View contentView, int width, int height)
			//contentView为要显示的view,
			//width和height为宽和高,值为像素值,也可以是MATCHT_PARENT和WRAP_CONTENT
			popupWindow=new PopupWindow(tipView, 200, 60);
		}

		tv.setText(content);

		popupWindow.setFocusable(true);
		popupWindow.setOutsideTouchable(true);
		popupWindow.setBackgroundDrawable(new BitmapDrawable());

		//相对view下方的位置,可以设置负值向相反方向移动,默认左上角为(0,0)
//		popupWindow.showAsDropDown(view, view.getWidth()/2,0-(3*view.getHeight())/2 );
		 int[] location = new int[2];
		 view.getLocationOnScreen(location);
		 //在点击的item上方中间 view为item,根据view,popuWindown计算的他们的宽长,从而确定位置
		  popupWindow.showAtLocation(view, Gravity.NO_GRAVITY,
				 location[0]+view.getWidth()/2-popupWindow.getWidth()/2,
				 location[1]-popupWindow.getHeight());
		//左方
//		 popupWindow.showAtLocation(view, Gravity.NO_GRAVITY, location[0]-popupWindow.getWidth(), location[1]);

		  //右边
		  //popupWindow.showAtLocation(view, Gravity.NO_GRAVITY, location[0]+v.getWidth(), location[1]);
		popupWindow.update();
	}
	private List<String> getData() {
		// TODO Auto-generated method stub
		  List<String> datas = new ArrayList<String>();
		for (int i = 0; i < 100; i++) {
			datas.add("test数据"+i);
		}
		return datas;
	}
智能推荐
台式电脑耳机插孔在哪_一图教你学会电脑主机后面各接口正确接线-程序员宅基地
文章浏览阅读4.3w次。电脑主机后面接口众多,很多人分不清各接口都分别起什么作用和怎么接线,下面就来重点说说经常易出错的各接口作用及连接方法。1、键盘鼠标接口:注意紫色的圆形接口为键盘接口,绿色的圆形接口为鼠标接口。如果你的键盘是紫色的圆形插头,请一定要插到紫色的接口上,另外还要注意分清方向哦,插错会导致键盘损坏。具体方法请参照网站《台式电脑键盘,重新插入后为什么不起作用了?》文章。如果你的键盘和鼠标都是US..._电脑后面的插孔图解
数据结构与算法 - 07 二分搜索与贪婪_基础结果搜索数据结构贪心-程序员宅基地
文章浏览阅读250次。二分搜索 Binary Search 定义 又叫 折半搜索 在有序数组中查找某一特定元素的搜索算法 前提:数组必须有序 优点 时间复杂度:O(lgn),非常高效 又叫 对数搜索 缺点 要求待查找的数组或区间是排好序的 应用 数据是排好序的,且不会经常变动 代码 递归 非递归 贪婪 Greedy 定义 每一步都采用在当前状态下最好或最优的选择,从而希望导致结果是最好或最优的算法 优点 从局部考_基础结果搜索数据结构贪心
【个人网站开发 · 记录四】开发阶段一 —— 原生VuePress开发(上)手动搭建个人博客网站的详细记录_vuepress创建项目模板还是手动-程序员宅基地
文章浏览阅读929次。文章目录一. 第一部分1.1 xxx1.2 xxx二. 第二部分2.1 yyy2.2 yyy前言部分一. 第一部分1.1 xxx1.2 xxx二. 第二部分2.1 yyy2.2 yyy_vuepress创建项目模板还是手动
kali系统简单入门_kali快速入门-程序员宅基地
文章浏览阅读997次。kali基础操作命令作用及格式_kali快速入门
word 此文件来自其它计算机,问题解决: 此文件来自其他计算机,可能被阻止以帮助保护该计算机/WORD在试图打开文件时遇到错误……...-程序员宅基地
文章浏览阅读3.1k次,点赞2次,收藏6次。最近,在打开下载的office文档(包括word、excel、ppt等)时候,总是无法直接打开,错误提示如下:无论是邮件中的还是别的网站下载的,均提示该错误。后来搜索相关资料发现,修改其文件属性即可打开(属性---》解除锁定)。但是也不能每次下载文件都去修改呀,太费事了。原因分析:这一切都要从WindowsXP的SP2说起,在SP2之前,大概是2004年吧,由于当时互联网得到了一个比较大的发展,导..._此文件来自其他计算机可能被阻止
谷歌chorme浏览器版本降级_如何将googlecharme的版本降低-程序员宅基地
文章浏览阅读3.8k次。升级了谷歌最新版不习惯,如何降级版本未完待续。。电脑中的Chrome谷歌浏览器升级到了最新版本,但是有种种的不适应,如何能恢复到之前的旧版本呢?我们来看看操作步骤,而且无需卸载重装。怎么恢复Chrome 之前版本?1、关闭Chrome进程,打开chrome.exe所在目录,在Win8下的路径是(X:\Users\用户名\AppData\Local\Google\Chrom..._如何将googlecharme的版本降低
随便推点
职业规划思维导图模板-程序员宅基地
文章浏览阅读1.5k次。职业规划思维导图模板下载链接: http://pan.baidu.com/s/1qWR6P68 密码: vgtd Facebook创业分析 财务菜鸟的职业规划 程序员必读的职业规划书 蕃茄工作法 ..._职业规划思维导图模板
JavaScript:滚动大小_js gundong的宽度-程序员宅基地
文章浏览阅读142次。JavaScript中的滚动大小scrollHeight:没有滚动条的情况下,元素内容的总高度;scrollWidth:没有滚动条的情况下,元素内容的总宽度;scrollLeft:被隐藏的内容区域左侧的像素数;scrollTop:被隐藏的内容区域顶部的像素数; 对于不包含滚动条的页面,各浏览器对前两个属性的解释有区别Firefox: scroll和client的数值是相同的,代表着内容区的实际数值;Opera,Sarafi,Chrome: scroll相当于视窗大小;client相当_js gundong的宽度
Linux命令行访问U盘内容_linux查看u盘命令-程序员宅基地
该文章介绍了使用Linux命令行访问U盘内容的方法,通过查看U盘信息、挂载U盘到指定文件夹、访问U盘内容等步骤实现。同时指出不能访问名称为中文的文件夹和文件。
阿里巴巴OSS对象存储在java中使用(简单好用,一看就会)_oss仓库java文档-程序员宅基地
文章浏览阅读3.1k次。阿里云OSS(Object Storage Service,对象存储服务)是一种高可用、高可靠、海量、安全的云存储服务,可以帮助用户存储和管理海量非结构化数据,如图片、音频、视频等。阿里云OSS提供了简单易用的API,可以方便地上传、下载、管理和分享数据。它还提供了多种数据存储类型和数据访问方式,以满足不同场景下的需求,如标准存储、低频访问存储、归档存储等。阿里云OSS还具有高可用性和高可靠性,它采用了多副本存储和多机房容灾技术,确保数据的安全性和可用性。_oss仓库java文档
NetSetMan IP快速切换_netsetman csdn-程序员宅基地
文章浏览阅读454次。NetSetMan 是一个小巧好用的工具,你可以设置五组不同的网络参数值,让使用者可以针对不同的网络环境,而调用不同的参数,只要使用NetSetMan,就可以让我们省去了许多时间,以及繁杂的网络设置步骤。 NetSetMan 可以让我们设置计算机IP地址、子网掩码、默认网关、DNS、计算机名、DNS 域、工作组、WINS、打印机等。除此之外还可以让我们运行Script(例如:bat、cmd、vbs_netsetman csdn
授权服务是如何颁发授权码和访问令牌的?_访问令牌 授权书-程序员宅基地
文章浏览阅读2.7k次,点赞2次,收藏2次。授权服务如何生成访问令牌?访问令牌过期了而用户又不在场的情况下,又如何重新生成访问令牌?授权服务的工作过程在 xx让我去公众号开放平台给它授权数据时,你是否好奇?开放平台怎么知道 xx 是谁?他合法备案了吗?万一是个病毒软件咋办?所以,授权的前提是xx要去开放平台备案,即注册。之后,开放平台就会给xx软件app_id和app_secret等,方便后面授权时的各种校验。注册时,三方软件也会请求受保护资源的可访问范围。比如,xx能否获取我的公众号半年前的文章,能否获取每个文章的所有信息(比如标题、封面_访问令牌 授权书