Koa 2 基础(仿知乎)_koa 设置状态码-程序员宅基地
Koa 2 基础
接口文档
REST 简介
REST是什么
REST是Resource Representational State Transfer的缩写,是一种Web服务架构,其目标是为了创建具有良好扩展性的分布式系统
资源在网络中以某种表现形式进行状态转移
-
Resource:资源,即数据(网络的核心)。
-
Representational:某种表现形式,比如用JSON,XML,JPEG等;
-
State:当前状态或者数据。通过HTTP动词实现。
-
Transfer: 数据传输
- REST描述的是在网络中client和server的一种交互形式;REST本身不实用,实用的是如何设计 RESTful API(REST风格的网络接口;
- Server提供的RESTful API中,URL中只使用名词来指定资源,原则上不使用动词。“资源”是REST架构或者说整个网络处理的核心。
- 用HTTP协议里的动词来实现资源的添加,修改。
- Server和Client之间传递某资源的一个表现形式,比如用JSON,XML传输文本,或者用JPG,WebP传输图片等。
- 用 HTTP Status Code传递Server的状态信息。比如最常用的 200 表示成功,500 表示Server内部错误等
REST的限制
客户-服务器(Client-Server)
- 关注点分离
- 服务端专注数据存储,提升了简单性
- 前端专注用户界面,提升了可移植性
无状态(Stateless)
-
所有用户会话信息都保存在客户端
-
每次请求必须包括所有信息,不能依赖上下文信息
-
服务端不用保存会话信息,提升了简单性、可靠性、可见性
缓存(Cache)
- 所有服务端响应都要被标为可缓存或不可缓存
- 减少前后端交互,提升了性能
统一接口(Uniform Interface)
- 接口设计尽可能统—通用,提升了简单性、可见性
- 接口与实现解耦,使前后端可以独立开发迭代
分层系统(Layered System )
-
每层只知道相邻的一层,后面隐藏的就不知道了
-
客户端不知道是和代理还是真实服务器通信
-
其他层:安全层、负载均衡、缓存层等
按需代码(Code-On-Demand可选)
- 客户端可以下载运行服务端传来的代码(比如JS )
- 通过减少一些功能,简化了客户端
统一接口的限制
资源的标识
- 资源是任何可以命名的事物,比如用户、评论等
- 每个资源可以通过URI被唯─地标识
通过表述来操作资源
- 表述就是Representation,比如JSON、XML等
- 客户端不能直接操作(比如SQL)服务端资源
- 客户端应该通过表述(比如JSON)来操作资源
自描述消息
-
每个消息(请求或响应)必须提供足够的信息让接受者理解
-
媒体类型 ( application/json、application/xml )
-
HTTP方法: GET(查)、POST(增)、DELETE(删)
-
是否缓存: Cache-Control
超媒体作为应用状态引擎
- 超媒体:带文字的链接
- 应用状态:一个网页
- 引擎∶驱动、跳转
- 合起来︰点击链接跳转到另一个网页
RESTful API简介
什么是RESTful API
符合REST架构风格的API
- 基本的URI,如https://api.github.com/users
- 标准HTTP方法,如GET,POST,PUT,PATCH,DELETE
- 传输的数据媒体类型,如JSON,XML
请求设计规范
-
URI使用名词,尽量用复数,如/users
-
URI使用嵌套表示关联关系,如/users/12/repos/5
-
使用正确的HTTP方法,如GET/POST/PUT/DELETE
-
不符合CRUD的情况:POST/action/子资源
响应设计规范
- 查询
- 分页
- 字段过滤
- 状态码
- 错误处理
安全
- HTTPS
- 鉴权
- 限流
开发者友好
- 文档
- 超媒体
Koa 简介
什么是Koa
Koa 通过 node.js 实现了一个十分具有表现力的 HTTP 中间件框架,力求让 Web 应用开发和 API 使用更加地愉快。Koa 的中间件之间按照编码顺序在栈内依次执行,允许您执行操作并向下传递请求(downstream),之后过滤并逆序返回响应(upstream)。
几乎所有 HTTP 服务器通用的方法都被直接集成到 Koa 大约570行源码的代码库中。其中包括内容协商,节点不一致性的规范化,重定向等等操作。
Koa没有捆绑任何中间件。
安装
因为node.js v7.6.0开始完全支持async/await,不需要加flag,所以node.js环境都要7.6.0以上
mkdir 文件名
cd 文件名
npm init -y
npm install --save koa
创建index.js文件,输出Hello World
const Koa = require('koa');
const app = new Koa();

app.use(async ctx => {

  ctx.body = 'Hello World';
});

app.listen(3000);
运行index.js
node index.js
自动重启(在开发阶段使用包)
npm i nodemon --save-dev
中间件与洋葱模型
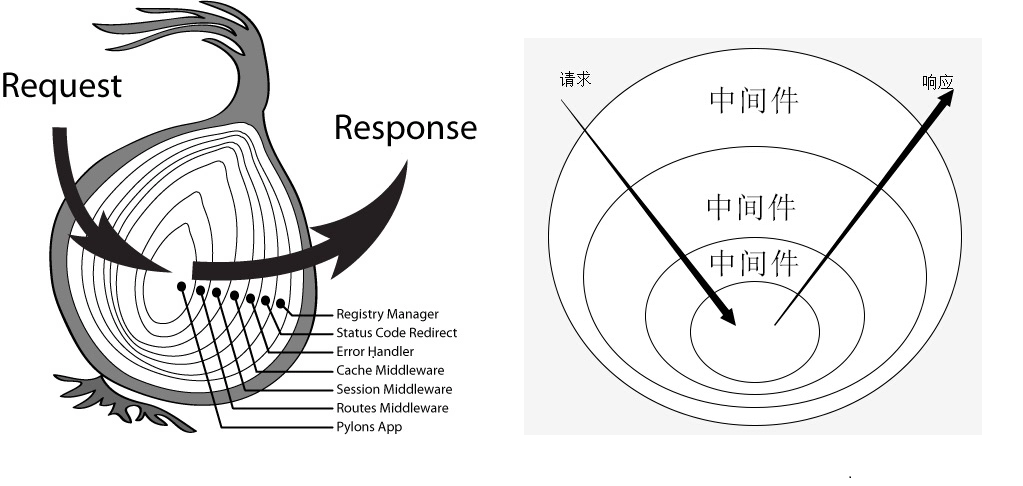
实例
const Koa = require('koa');
const app = new Koa();

app.use(async (ctx, next) => {

  console.log('中间件 1 进入');
  await next();
  console.log('中间件 1 退出');
});

app.use(async (ctx, next) => {

  console.log('中间件 2 进入');
  await next();
  console.log('中间件 2 退出');
});

app.use(async (ctx, next) => {

  console.log('中间件 3');
});

app.listen(3000);
结果
中间件 1 进入
中间件 2 进入
中间件 3
中间件 2 退出
中间件 1 退出
路由简介
路由是什么
- 决定了不同URL是如何被不同地执行的
- 本质: 在Koa中,是一个中间件
路由存在的意义
- 处理不同的URL
- 处理不同的HTTP方法
- 解析URL上的参数
自己编写Koa路由中间件
const Koa = require('koa');
const app = new Koa();

app.use(async ctx => {

    if(ctx.url === '/'){

        ctx.body = '主页'
    }else if (ctx.url === '/users'){

        if (ctx.method === 'GET'){

            ctx.body = '用户'
        }else if (ctx.method === 'POST'){

            ctx.body = '创建用户'
        }
    }else if (ctx.url.match(/\/users\/\w+/)){

        const userId = ctx.url.match(/\/users\/(\w+)/)[1]
        ctx.body = `用户${
      userId}`
    } else {

        ctx.status = 405
    }
});

app.listen(3000);
使用Koa-router实现路由
安装Koa-router
npm i koa-router --save
实现
const Koa = require('koa');
const Router = require('koa-router')
const app = new Koa();
const router = new Router()
const usersRouter = new Router({prefix:'/users'})

const auth = async (ctx, next)=>{
    if(ctx.url !== '/users'){
        ctx.throw(401)
    }
    await next();
}

router.get('/',auth,ctx => {
    ctx.body = '主页'
})
usersRouter.get('/',auth,ctx => {
    ctx.body = '用户'
})
usersRouter.post('/',auth,ctx => {
    ctx.body = '创建用户'
})
usersRouter.get('/:id',auth,ctx => {
    ctx.body = `用户 ${ctx.params.id}`
})

app.use(router.routes())
app.use(usersRouter.routes())


app.listen(3000);
HTTP options方法的作用是什么?
options作用
- 检测服务器所支持的请求方法
- CORS 中的预检请求
allowedMethods的作用
- 响应options方法,告诉它所支持的请求方法
- 相应地返回405(不允许)和501(没实现)
控制器简介
什么是控制器
- 拿到路由分配的任务,并执行
- 在Koa中,是一个中间件
为什么要用控制器
- 获取 HTTP 请求参数
- 处理业务逻辑
- 发送 HTTP 响应
获取 HTTP 请求参数
- Query String,如?q=keyword,是可选项
- Router Params,如/user/:id,是必选项
- Body,如{name: “李雷”},请求体,一般为json
- Header,如Accept、Cookie
断点调试
调试使用的是vscode,点击F5,进入调试(这里注意一下,不要自己在其他地方执行npm start,也不需要自己来执行这个命令行启动服务器,当进入调试的时候,将会自动启动服务器,否则会出现冲突报错)
获取query
也就是获取请求中 ? 后面的参数
获取 router params
获取路径后的参数
获取body
获取请求体,一般我们常用格式为json。安装一个 koa-bodyparser 插件,否则获取不到。
参考文章 koa2 使用 koa-body 代替 koa-bodyparser 和 koa-multer。
全局引用中间件,就是app.use(中间件),否则就是路由级引用,也就是router.use(‘路由地址’, 中间件)
安装插件
npm i koa-bodyparser --save
引入,解析请求体
const bodyparser = require('koa-bodyparser');
app.use(bodyparser());
获取 header
请求的content-type
发送 HTTP 响应
- 发送 Status,如 200/400 等
- 发动 Body,如{name: “李雷”}
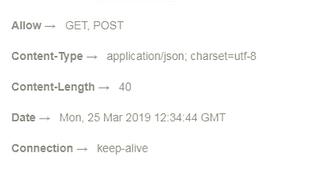
- 发送 Header,如 Allow、 Content-type
发送status
设置
body.status = 204,就是设置响应为204状态码
发送body
设置
ctx.body = '这是设置body',就是设置响应body,内容为’这是设置body’
发送 header
user除了有GET方法,还有POST方法
实现用户增删改查
const Koa = require('koa');
const bodyparser = require('koa-bodyparser');
const Router = require('koa-router');
const app = new Koa();
const userRouter = new Router({
    prefix: '/user'});

// 内存数据库
const db = [{
    name: '李雷'}];

// 获取用户列表
userRouter.get('/', (ctx) => {

    ctx.body = db;
});

// 增加用户
userRouter.post('/', (ctx) => {

    db.push(ctx.request.body);
    ctx.body = ctx.request.body;
});

// 获取特定用户
userRouter.get('/:id', (ctx) => {

    ctx.body = db[+ctx.params.id];
});

// 修改特定用户
userRouter.put('/:id', (ctx) => {

    db[+ctx.params.id] = ctx.request.body;
    ctx.body = ctx.request.body;
});

// 删除用户
userRouter.delete('/:id', (ctx) => {

    db.splice(+ctx.params.id, 1);
    ctx.status = 204; // 没有内容,但是成功了
});

app.use(bodyparser());
app.use(userRouter.routes());
app.use(userRouter.allowedMethods());


app.listen(3000, () => {

    console.log(`start server...`);
});
编写控制器最佳实践
- 每个资源的控制器放在不同的文件里
- 尽量使用类+类方法的形式编写控制器
- 严谨的错误处理
|- 根目录
  |- app
    |- routes
      |- home.js -- 主页路由
      |- users.js -- 用户列表页路由
      |- index.js -- 批量读取文件,并批量注册到app上
    |- controllers
      |- home.js -- 主页控制器
      |- users.js -- 用户列表页控制器
    |- index.js -- 入口文件
  |- node_modules
  |- LICENSE
  |- package-lock.json
  |- package.json
  |- README.md
错误处理简介
什么是错误处理?
- 编程语言或计算机硬件里的一种机制
- 处理软件或信息系统中出现的异常状况
异常状况有哪些?
- 运行时错误,都返回500(语法正确,但是运行时候发生错误)
- 逻辑错误,如找不到(404)、先决条件失败(412)、无法处理的实体(参数格式不对,422)等
为什么要用错误处理?
- 防止程序挂掉
- 告诉用户错误信息
- 便于开发者调试
自带的错误处理
制造 404、412、500 三种错误
401
客户端查找没有的接口
412
findById (ctx) {
    if (+ctx.params.id >= db.length) {
        // ctx.body = '先决条件失败:id 大于数组条件长度';
        // ctx.status = 412;
        // return;

        ctx.throw(412, '先决条件失败:id 大于数组条件长度'); // 等价于上面三句话
    }

    ctx.body = db[+ctx.params.id];
}
500
运行时的错误
find (ctx) {
    a.b; // a 未定义,undefined去获取属性b
    ctx.body = db;
}
自己编写错误处理中间件
该中间件只需要写在所有中间件前面,然后捕获next中间件,利用冒泡便可以捕获到所有的异常。捕获异常跟javascript一样,使用try/catch进行捕获处理。根据RESTful风格,我们使用 json 将异常吐出来。这里面我们怎么知道err有什么属性可以获取?通过前面打断点的方式,来查看捕获到的 err 存在什么字段信息,便可以直接制造一个我们需要的异常报错信息了
const Koa = require('koa');
const bodyparser = require('koa-bodyparser');
const app = new Koa(); // 实例化koa
const routes = require('./routes');

// 错误处理中间件
app.use(async (ctx, next) => {

    try {

        await next();

        // 捕获不到异常,但状态码为404
        if (ctx.status === 404) {

            ctx.body = {

                message: '页面找不到'
            }
        }
    } catch (err) {

        // 如果没捕获到状态码,证明是服务器内部错误
        ctx.status = err.status || err.statusCode || 500;
        ctx.body = {

            message: err.message
        }
    }
});

// 启动路由
app.use(bodyparser());
routes(app);

app.listen(3000, () => {

    console.log(`start server...`);
});
使用 koa-json-error 进行错误处理
安装
安装
npm i koa-json-error --save
声明并加入全局
const error = require('koa-json-error');
app.use(error());

修改配置使其在生产环境下禁用错误堆栈的返回
- 入口文件
app.use(error({

    // 后置的修改返回格式
    postFormat: (err, {
    stack, ...rest}) => process.env.NODE_ENV === 'production' ? rest : {
    stack, ...rest}
}));
- 安装插件
npm i cross-env --save
- 配置package.js
"scripts": {

    "start": "cross-env NODE_ENV=production node app",
    "dev": "nodemon app"
  }
使用 koa-parameter 校验参数
安装
安装
npm i koa-parameter --save
声明并加入全局
const parameter = require('koa-parameter');
app.use(parameter(app));
使用 koa-parameter 校验参数
const db = [{
    name: '李雷'}];

class UsersCtl {

    find (ctx) {

        a.b;
        ctx.body = db;
    }

    findById (ctx) {

        if (+ctx.params.id >= db.length) {

            ctx.throw(412, '先决条件失败:id 大于数组条件长度'); // 等价于上面三句话
        }

        ctx.body = db[+ctx.params.id];
    }

    create (ctx) {

        ctx.verifyParams({

            name: {

                type: 'string',
                required: true
            },
            age: {

                type: 'number',
                required: false
            }
        });

        db.push(ctx.request.body);
        ctx.body = ctx.request.body;
    }

    update (ctx) {

        if (+ctx.params.id >= db.length) {

            ctx.throw(412, '先决条件失败:id 大于数组条件长度'); // 等价于上面三句话
        }

        ctx.verifyParams({

            name: {

                type: 'string',
                required: true
            },
            age: {

                type: 'number',
                required: false
            }
        });

        db[+ctx.params.id] = ctx.request.body;
        ctx.body = ctx.request.body;
    }

    delete (ctx) {

        if (+ctx.params.id >= db.length) {

            ctx.throw(412, '先决条件失败:id 大于数组条件长度'); // 等价于上面三句话
        }

        db.splice(+ctx.params.id, 1);
        ctx.status = 204; // 没有内容,但是成功了
    }
}

module.exports = new UsersCtl();
NoSQL 简介
什么是 NoSQL
- 对不同于传统的关系型数据库的数据库管理系统的统称
关系型数据库,如mysql
NoSQL 数据库的分类
- 列存储(HBase)
- 文档存储(MongoDB)-- 例如存储json
- Key-value(Redis)
- 图存储(FlockDB)
- 对象存储(db4o)
- XML存储(BaseX)
为什么要用NoSQL
- 简单(没有原子性、一致性、隔离性等复杂规范)
- 便于横向拓展
- 适合超大规模数据的存储
- 很灵活的存储复杂结构的数据(Schema Free)
MongoDB 简介
什么是 MongoDB
- 来自于英文单词 “Humoongous”,中文含义为庞大
- 面向文档存储的开源数据库
- 由 C++ 编写而成
为什么要用 MongoDB
- 性能好(内存计算)
- 大规模数据存储(可拓展性)
- 可靠安全(本地复制、自动故障转移)
- 方便存储复杂数据结构(Schema Free)
MongoDB 下载
- 官网下载
- 支持常见平台(Windows、Linux、OSX)
云 MongoDB
- 阿里云、腾讯云(收费)
- MongoDB 官方的 MongoDB Atlas(免费 + 收费)
云数据库 – MongoDB Atlas
使用 Mongoose 连接 MongoDB
安装
安装
npm i mongoose --save
引用
const mongoose = require('mongoose');
const { connectionStr } = require('../config.js');

// 连接 mongoDB
// mongoose.connect(connectionStr, { useNewUrlParser: true,useUnifiedTopology: true } , () => console.log('MongoDB 连接成功'));
mongoose.connect(connectionStr, { useNewUrlParser: true,useUnifiedTopology: true } , () => console.log('MongoDB 连接成功'));
// 打印错误信息
mongoose.connection.on('error', console.error);
创建config.js并添加
// config.js password 填密码,不要留 <> 号
module.exports = {
    connectionStr: 在线 mongoDB 拿到的连接地址,
    connectionLocal: 'mongodb://localhost:27017/database' // 连接本地mongoDB
}
设计用户模块的 Schema
创建文件夹
|- models
  |- users.js
导入
// models/user.js
const mongoose = require('mongoose');

const { Schema, model } = mongoose;

const userSchema = new Schema({
    name: { type: String, required: true },
    age: { type: Number, default: 0 }
});

// users代表集合,导出的是一个类
module.exports = model('user', userSchema);
用 MongoDB 实现用户的增删改查
在controllers/users.js文件下修改
// controller.js/users.js
const User = require('../models/users');

class UsersCtl {
    async find (ctx) {
        ctx.body = await User.find();
    }

    async findById (ctx) {
        const user = await User.findById(ctx.params.id);
        if(!user) ctx.throw(404, '用户不存在');
        ctx.body = user;
    }

    async create (ctx) {
        ctx.verifyParams({
            name: { type: 'string', required: true }
        });

        // save方法,保存到数据库。并根据 RESTful API最佳实践,返回增加的内容
        const user = await new User(ctx.request.body).save();
        ctx.body = user;
    }

    async update (ctx) {
        ctx.verifyParams({
            name: {
                type: 'string',
                required: true
            }
        });

        // findByIdAndUpdate,第一个参数为要修改的数据id,第二个参数为修改的内容
        const user = await User.findByIdAndUpdate(ctx.params.id, ctx.request.body);
        if(!user) ctx.throw(404, '用户不存在');
        ctx.body = user;
    }

    async delete (ctx) {
        const user = await User.findByIdAndRemove(ctx.params.id);
        if(!user) ctx.throw(404, '用户不存在');
        ctx.status = 204; // 没有内容,但是成功了
    }
}

module.exports = new UsersCtl();
Session 简介
Session是什么
Session字面含义就是会话。由于HTTP是无状态协议,为了保持浏览器与服务器之间的联系,才有了Session。Session就是用于在服务器端保存用户状态的协议。通常用来保存用户的登录状态
工作原理

Session内容保存在服务器端的,通常是保存在内存中,当然也可以保存在文件、数据库等等。客户端跟服务器端通过SessionId来关联,SessionId通常以Cookie的形式存储在客户端。每次HTTP请求,SessionId都会随着Cookie被传递到服务器端,这行就可以通过SessionId取到对应的信息,来判断这个请求来自于哪个客户端/用户。
Session 的优势
- 相比 JWT,最大的优势就在于可以主动清楚session了
- session 保存在服务器端,相对较为安全
- 结合 cookie 使用,较为灵活,兼容性较好(客户端服务端都可以清除,也可以加密)
Session 的劣势
- cookie+session 在跨域场景表现并不好(不可跨域,domain变量,需要复杂处理跨域)
- 如果是分布式部署,需要做多机共享 Session 机制(成本增加)
- 基于 cookie 的机制很容易被 CSRF(被攻击)
- 查询 Session 信息可能会有数据库查询操作
Session 相关的概念介绍
- session:主要存放在服务器,相对安全
- cookie:主要存放在客户端,并且不是很安全
- sessionStorage:仅在当前会话下有效,关闭页面或浏览器后被清除
- localstorage:除非被清除,否则永久保存
JWT简介
什么是 JWT?
- JSON Web Token 是一个开放标准(RFC 7519)
- 定义了一种紧凑且独立的方式,可以将各方面之间的信息作为 JSON 对象进行安全传输
- 该信息可以验证和信任,因为是经过数字签名的
JWT 的构成
- 头部(Header)
- 有效载荷(Payload)
- 签名(Signature)
JWT 的例子
不同颜色,. 号结束,红色代表Header,紫色代表Payload,蓝色代表Signature

Header
Header,本质是JSON,使用 Base64 编码,因此更加紧凑。Header 包含下面两个字段:
- typ:token的类型,这里固定为 JWT
- alg:使用 hash 算法,例如 HMAC SHA256 或者 RSA
Header 编码前后
编码前:{
    "alg": "HS256", "typ": "JWT"}
编码后:'eyJhbGciOiAiSFMyNTYiLCAidHlwIjogIkpXVCJ9'
Payload
- 存储需要传递的信息,如用户ID、用户名等
- 还包含元数据,如过期时间、发布人等
- 与 Header 不同,Payload 可以加密
Payload 编码前后
编码前:{
    "user_id": "zhangsan"}
编码后: 'eyJ12VylkIjoiemhhbmdzYW4ifQ=='
由于base64会忽略最后的等号,所以结果为: 'eyJ12VylkIjoiemhhbmdzYW4ifQ'
Signature
- 对 Header 和 Payload 部分进行签名
- 保证 Token 在传输的过程中没有被篡改或者损坏
Signature 算法
Signature = HMACSHA256(base64UrlEncode(header) + “.” + base64UrlEncode(payload), secret),生成完之后依然需要进行一次 base64 编码
JWT 原理

以登录为例,浏览器端通过 post 请求将用户名和密码发送给服务端,服务端接受完进行核对,核对成功后将用户 ID 和其他信息作为有效载荷(Payload),将其与头部进行 base64 编码之后,形成一个 JWT。服务端将该 JWT 作为登录成功的返回结果,返回给浏览器端,浏览器端将其保存在 localstorage 或 sessionStorage 中。接下来的每次请求,都将带上该 JWT (请求头中,Authorization: Bearer**JWT **),服务端接收后都将核对(身份,令牌是否过期等),并返回相关的用户信息
JWT vs Session
- 可拓展性(水平拓展:加服务器,垂直拓展:增加硬盘容量,内存等,JWT优胜)
- 安全性(两者均有缺陷)
- XSS攻击(跨站脚本攻击):JS均能篡改;防范:签名/加密,敏感信息不要放其中;
- CSRF(跨站请求伪造):两者都能被篡改
- 重犯攻击:过期时间尽量短
- 中间人攻击:HTTPS来解决
- RESTful API,JWT优胜,因为RESTful API提倡无状态,JWT符合要求
- 性能(各有利弊,因为JWT信息较强,所以体积也较大。不过Session每次都需要服务器查找,JWT信息都保存好了,不需要再去查询数据库)
- 时效性,Session能直接从服务端销毁,JWT只能等到时效性到了才会销毁(修改密码也无法阻止篡夺者的使用)
在 Nodejs 中使用 JWT
安装
安装
npm i jsonwebtoken
签名
- 执行
node,进入 node 环境 - 执行
jwt = require('jsonwebtoken');引入jwt - 执行
token = jwt.sign({name: 'yose'}, 'secret');生成token,secret 则代表密钥,后面用于验证使用的 - 执行
jwt.decode(token);直接解码,但是并不会验证,所以并不会用 - 执行
jwt.verify(token, 'secret');验证密钥并解码,可以看到返回{ name: 'yose', iat: 1565110602 }iat代表的是签名时的时间,单位毫秒
验证
- 执行
jwt.verify(token, 'secret1');密钥被篡改,返回JsonWebTokenError: invalid signature,密钥校验失败 - 执行
jwt.verify(token.replace('e', 'a'), 'secret');签名篡改,返回JsonWebTokenError: invalid token,令牌校验失败
实现用户注册
设计用户 Schema
在models/users.js文件下添加password字段,用来表示用户注册密码(调用接口时密码不能够显示)
const userSchema = new Schema({
    __v: { type: Number, select: false },
    name: { type: String, required: true },
    password: { type: String, required: true, select: false },
});
编写保证唯一性的逻辑
在controllers/users.js文件下创建和更新新增密码,而更新则需要将校验全部改为非必传(因为可以进行局部更改)
async create (ctx) {
    ctx.verifyParams({
        name: { type: 'string', required: true },
        password: { type: String, required: true},
    });
    // save方法,保存到数据库。并根据 RESTful API最佳实践,返回增加的内容
    const user = await new User(ctx.request.body).save();
    ctx.body = user;
}

async update (ctx) {
    ctx.verifyParams({
        name: {type: 'string', required: false},
        password: { type: String, required: false},
    });

    // findByIdAndUpdate,第一个参数为要修改的数据id,第二个参数为修改的内容
    const user = await User.findByIdAndUpdate(ctx.params.id, ctx.request.body);
    if(!user) ctx.throw(404, '用户不存在');
    ctx.body = user;
}
考虑到对已经验证过得身份不能够再次注册,并且用户可能只是更改用户名,但其他信息不更换,那么根据 RESTful API 规范,我们需要在routers/users.js文件下将 put(全部更改) 方法改成 patch(局部更改)
// 修改特定用户
router.patch('/:id', update);
查重,create方法新增去重,并对密码进行校验(实际是为了报错信息友好)
async create (ctx) {
    ctx.verifyParams({
        name: { type: 'string', required: true },
        password: { type: 'string', required: true }
    });

    // 查重
    const { name } = ctx.request.body;
    const requesteUser = await user.findOne({ name });

    if(requesteUser) ctx.throw(409, '用户已经存在');

    // save方法,保存到数据库。并根据 RESTful API最佳实践,返回增加的内容
    const user = await new User(ctx.request.body).save();
    ctx.body = user;
}
实现登陆并获取Token
登陆接口设计
根据github接口,采用 post+动词形式来定义,路由新增login,控制器里添加login方法
const {login} = require('../controllers/users');
// 登陆
router.post('/login', login);
用 jsonwebtoken 生成 token
module.exports = {
    secret: 'zhihu-jwt-secret', // 正常需要通过环境变量获取
}
const jsonwebtoken = require('jsonwebtoken');
const {
     secret } = require('../../config');

async login (ctx) {

    ctx.verifyParams({

        name: {
     type: 'string', required: true },
        password: {
     type: 'string', required: true }
    });

    const user = await User.findOne(ctx.request.body);
    if(!user) ctx.throw(401, '用户名或密码不正确');

    const {
     _id, name } = user;
    const token = jsonwebtoken.sign({
     _id, name }, secret, {
     expiresIn: '1d' });
    ctx.body = {
     token };
}
自己编写 Koa 中间件实现用户认证与授权
自动化脚本获取到taken
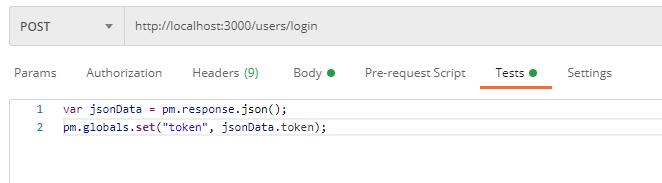
var jsonData = pm.response.json();
pm.globals.set("token", jsonData.token);
认证
// router/users.js
const jsonwebtoken = require('jsonwebtoken');
const { secret} = require('../config');

// 认证中间件
const auth = async (ctx, next) => {
    const { authorization = '' } = ctx.request.header; // 没token得用户默认为空字符串,否则报语法错误
    const token = authorization.replace('Bearer ', ''); //需要对value进行处理

    try {
        const user = jsonwebtoken.verify(token, secret);
        ctx.state.user = user; // 约定俗成,一般就是放这里用户信息,也是没有为什么
    } catch (err) {
        ctx.throw(401, err.message);
    }

    await next();
}

// 修改特定用户
router.patch('/:id',auth, update);

// 删除用户
router.delete('/:id',auth, del);
授权
控制器(检查一下用户的id跟要修改的用户数据id是否一致)
async checkOwner (ctx, next) {

    if (ctx.params.id !== ctx.state.user._id) ctx.throw('403', '没有权限');
    await next();
}
const {
     find, findById, create, update, delete: del, login,checkOwner } = require('../controllers/users');

// 修改特定用户
router.patch('/:id', auth, checkOwner, update);

// 删除用户
router.delete('/:id', auth, checkOwner, del);
用 koa-jwt 中间件实现用户认证与授权
安装
安装
npm i koa-jwt --save
使用中间件保护接口
// 替换jsonwebtoken
const jwt = require('koa-jwt');
// 认证中间件
const auth = jwt({
     secret });
上传图片
上传图片需求分析
上传图片的需求场景
- 用户头像
- 封面图片
- 问题和回答中的图片
- 话题图片
- …
上传图片的功能点
- 基础功能:上传图片、生成图片链接
- 附加功能:限制上传图片的大小与类型、生成高中低三种分辨率的图片链接,生成CDN(内容分发网络)
上传图片的技术方案
- 阿里云 OSS 等云服务,推荐在生产环境中使用
- 直接上传到服务器,不推荐在生产环境中使用
使用 koa-body 中间件获取上传的文件
安装
安装和卸载
npm i koa-body --save
npm uninstall koa-bodyparser --save
设置图片上传目录
在index.js文件下用koa-body替换bodyparser
const koaBody = require('koa-body'); // 替换原本的 bodyparser
const path = require('path'); // 因为上传目录需要填写路径,所以需要用到 node 自带的 path 组件

app.use(koaBody({

    multipart: true, // 启用文件
    formidable: {

        uploadDir: path.join(__dirname, 'public/uploads'), // 上传路径
        keepExtensions: true // 保留拓展名
    }
}));
在home.js文件下获取上传
class HomeCtl {

    index (ctx) {

        ctx.body = '<h1>主页</h1>'
    }
    // 新增 upload 方法
    upload (ctx) {

        const file = ctx.request.files.file;
        ctx.body = {

            path: file.path
        };
    }
}

module.exports = new HomeCtl();
在routers/home.js添加
const {
    index,upload} = require('../controllers/home')

router.post('/upload', upload);
使用 koa-static 中间件生成图片链接
安装
安装
npm i koa-static --save
设置静态文件目录
const koaStatic = require('koa-static');
// 使用koa-static,设置当前目录下的 public 文件夹作为上传图片的存储文件夹(静态资源文件夹)
app.use(koaStatic(path.join(__dirname, 'public')));
生成图片链接
在controllers/home.js文件下
const path = require('path');

upload (ctx) {

    const file = ctx.request.files.file;
    const basename = path.basename(file.path);
    ctx.body = {

        url: `${
      ctx.origin}/uploads/${
      basename}`
    };
}
编写前端页面上传文件
编写上传文件的前端页面
<form action="/upload" enctype="multipart/form-data" method="POST">
    <input type="file" name="file" accept="image/*">
    <button type="submit">上传</button>
</form>
个人资料需求分析
需求分析
个人资料功能点
- 不同类型(如字符串、数组)的属性
- 字段过滤
schema 设计
分析&设计 schema
在models.js文件下添加
const mongoose = require('mongoose');

const {
     Schema, model } = mongoose;

const userSchema = new Schema({

    __v: {
     type: Number, select: false },
    name: {
     type: String, required: true },
    password: {
     type: String, required: true, select: false },
    avatar_url: {
     type: String }, // 用户头像
    gender: {
     type: String, enum: ['male', 'female'], default: 'male', required: true }, // enum 可枚举,性别
    headline: {
     type: String }, // 一句话简介
    locations: {
     type: [{
     type: String }] }, // 可枚举的字符串数组,居住地
    business: {
     type: String }, // 行业
    employments: {
      // 职业经历
        type: [{

            company: {
     type: String },// 公司名称
            job: {
     type: String }// 职业
        }]
    },
    educations: {
     // 教育经历
        type: [{

            school: {
     type: String },// 学校
            major: {
     type: String },// 专业
            diploma: {
     type: Number, enum: [1, 2, 3, 4, 5] },// 学历
            entrance_year: {
     type: Number },// 入学年份
            graduation_year: {
     type: Number }// 毕业年份
        }]
    }
});

// user代表集合,导出的是一个类
module.exports = model('user', userSchema);
参数效验
分析&编写代码校验个人资料参数
在controllers/users.js文件下更新模块添加
async update (ctx) {

    ctx.verifyParams({

        name: {
     type: 'string', required: false },
        password: {
     type: 'string', required: false },
        avatar_url: {
     type: 'string', require: false },
        gender: {
     type: 'string', require: false },
        headline: {
     type: 'string', require: false },
        locations: {
     type: 'array',itemType: 'string', require: false },
        business: {
     type: 'string', require: false },
        employments: {
     type: 'array',itemType: 'object', require: false },
        educations: {
     type: 'array',itemType: 'object', require: false }
    });

    // findByIdAndUpdate,第一个参数为要修改的数据id,第二个参数为修改的内容
    const user = await User.findByIdAndUpdate(ctx.params.id, ctx.request.body);
    if(!user) ctx.throw(404, '用户不存在');
    ctx.body = user;
}
字段过滤
设计 schema 默认隐藏部分字段
const userSchema = new Schema({

    __v: {
     type: Number, select: false },
    name: {
     type: String, required: true },
    password: {
     type: String, required: true, select: false },
    avatar_url: {
     type: String }, // 用户头像
    gender: {
     type: String, enum: ['male', 'female'], default: 'male', required: true }, // enum 可枚举,性别
    headline: {
     type: String }, // 一句话简介
    locations: {
     type: [{
     type: String }], select: false}, // 可枚举的字符串数组,居住地
    business: {
     type: String, select: false }, // 行业
    employments: {
      // 职业经历
        type: [{

            company: {
     type: String },// 公司名称
            job: {
     type: String }// 职业
        }],
        select: false
    },
    educations: {
     // 教育经历
        type: [{

            school: {
     type: String },// 学校
            major: {
     type: String },// 专业
            diploma: {
     type: Number, enum: [1, 2, 3, 4, 5] },// 学历
            entrance_year: {
     type: Number },// 入学年份
            graduation_year: {
     type: Number }// 毕业年份
        }],
        select: false
    }
});
过查询字符串显示隐藏字段
在controllers/users.js文件下添加
async findById (ctx) {

    const {
     fields } = ctx.query;
    // 分割,并剔除空的fields,比如直接写fields=;这个时候应该返回一个空数组
    const selectFields = fields.split(';').filter(f => f).map(f => ' +'+f).join('');
    const user = await User.findById(ctx.params.id).select(selectFields);
    if(!user) ctx.throw(404, '用户不存在');
    ctx.body = user;
}
关注与粉丝需求分析
需求分析
细化关注与粉丝功能点
- 关注、取消关注
- 获取关注人、粉丝列表(用户-用户多对多关系)
schema 设计
分析关注与粉丝的数据结构
字段将超过 4M ,在 mongoose 中会认为是设计不合理的
设计关注与粉丝 schema
在models/users.js文件下添加关注的人
following: {
     // 关注的人
        type: [{

            type: Schema.Types.ObjectId, // 用户ID,这里属于特殊类型,必须用Schema提供的类型
            ref: 'user'//这里是小写的user,后面可能会报错
        }],
        select: false
    }
风格的关注与粉丝接口
实现获取关注人和粉丝列表接口 & 关注和取消关注
在controllers/users.js文件下接口
async listFollowing (ctx) {

    const user = await User.findById(ctx.params.id).select('+following').populate('following');
    if(!user) ctx.throw(404);
    ctx.body = user.following;
}

async listFollowers (ctx) {

    const users = await User.find({
     following: ctx.params.id }); // 查找following包含自己id的用户
    ctx.body = users;
}

async follow (ctx) {

    const me = await User.findById(ctx.state.user._id).select('+following');
    // me 会拿到当前用户信息,拿到后再去查询一下是否关注的对象是否已经在关注数组里,如果没有就添加进关注数组里并保存
    // 否则关注者的数组里会存在多个已关注对象
    // 由于following数组里保存的是 schema 对象,所以需要使用将其变换成字符串来查重
    if(!me.following.map(id => id.toString()).includes(ctx.params.id)) {

        me.following.push(ctx.params.id);
        me.save();
    }
    ctx.status = 204;
}

async unfollow (ctx) {

    const me = await User.findById(ctx.state.user._id).select('+following');
    const index = me.following.map(id => id.toString()).indexOf(ctx.params.id);
    if(index > -1) {

        me.following.splice(index, 1);
        me.save();
    }
    ctx.status = 204;
}
在routers/users.js文件下添加
// 获取关注列表
router.get('/:id/following', listFollowing);

// 获取粉丝
router.get('/:id/followers', listFollowers)

// 关注某人
router.put('/following/:id', auth, follow); // 这里需要用到当前用户的信息,也就是token,所以需要加auth中间件

// 取消关注某人
router.put('/unfollowing/:id', auth, unfollow);
编写校验用户存在与否的中间件
在routers/users.js文件下添加
// 关注某人
router.put('/following/:id', auth, checkUserExist, follow);

// 取消关注某人
router.put('/unfollowing/:id', auth, checkUserExist, unfollow);
在controllers/users.js文件下接口
async checkUserExist (ctx, next) {

    const user = await User.findById(ctx.params.id);
    if(!user) ctx.throw(404, '用户不存在');

    await next();
}
话题模块需求分析
功能点
- 话题的增改查
- 分页、模糊搜索
- 用户属性中的话题引用·
- 关注/取消关注话题、用户关注的话题列表
增改查接口
设计 Schema
新建文件,在models/topics.js文件下添加
const mongoose = require('mongoose');

const {
     Schema, model } = mongoose;

const topicSchema = new Schema({

    __v: {
     type: Number, select: false },
    name: {
     type: String, required: true },// 名字
    avatar_url: {
     type: String },// 图片(头像)
    introduction: {
     type: String, select: false } // 简介
});

// user代表集合,导出的是一个类
module.exports = model('Topic', topicSchema);
实现 RESTful 风格的增改查接口
新建文件(控制器),在controllers/topics.js文件下添加
const jsonwebtoken = require('jsonwebtoken');
const {
     secret } = require('../../config');
const Topic = require('../models/topics');

class TopicsCtl {

    async find (ctx) {

        ctx.body = await Topic.find();
    }

    async findById (ctx) {

        const {
     fields = '' } = ctx.query;
        const selectFields = fields.split(';').filter(f => f).map(f => ' +'+f).join('');
        const topic = await Topic.findById(ctx.params.id).select(selectFields);
        if(!topic) ctx.throw(404, '用户不存在');
        ctx.body = topic;
    }

    async create (ctx) {

        ctx.verifyParams({

            name: {
     type: 'string', required: true },
            avatar_url: {
     type: 'string', required: false },
            introduction: {
     type: 'string', required: false }
        });
        const {
     name } = ctx.request.body;
        const requesteTopic = await Topic.findOne({
     name });
        if(requesteTopic) ctx.throw(409, '话题已经存在');
        const topic = await new Topic(ctx.request.body).save();
        ctx.body = topic;
    }

    async update (ctx) {

        ctx.verifyParams({

            name: {
     type: 'string', required: false },
            avatar_url: {
     type: 'string', require: false },
            introduction: {
     type: 'string', require: false }
        });
        const topic = await Topic.findByIdAndUpdate(ctx.params.id, ctx.request.body);
        if(!topic) ctx.throw(404, '话题不存在');
        ctx.body = topic;
    }

}

module.exports = new TopicsCtl();
新建文件(路由),在routes/topics.js文件下添加
const jwt = require('koa-jwt');
const {
    secret} = require('../../config');
const Router = require('koa-router');
const router = new Router({
    prefix: '/topics'});
const {
     find, findById, create, update} = require('../controllers/topics');


// 认证中间件
const auth = jwt({
     secret });

// 获取话题列表
router.get('/', find);

// 增加话题
router.post('/',auth, create);

// 获取特定话题
router.get('/:id', findById);

// 修改特定话题
router.patch('/:id',auth, update);


module.exports = router;
分页
分页适用于话题的分页和用户的分页
在controllers/topics.js和users.js文件下分别添加
// controllers/topics.js
async find (ctx) {

        const {
     per_page = 10 } = ctx.query;
        const page =  Math.max(+ctx.query.page, 1) - 1;
        const perPage = Math.max(+ctx.query.per_page, 1);
        ctx.body = await Topic.find().limit(perPage).skip(page * perPage); // limit: 返回多少数量,skip:跳过多少数量
    }


// controllers/users.js
async find (ctx) {

        const {
     per_page = 10 } = ctx.query;
        const page =  Math.max(+ctx.query.page, 1) - 1;
        const perPage = Math.max(+ctx.query.per_page, 1);
        ctx.body = await User.find().limit(perPage).skip(page * perPage);
    }
模糊搜索
mongoose的find方法用正则表达式匹配
在controllers/topics.js和users.js文件下分别添加
// controllers/topics.js
async find (ctx) {

    ctx.body = await Topic.find({
     name: new RegExp(ctx.query.q) }).limit(perPage).skip(page * perPage);
}

// controllers/users.js
async find (ctx) {

    ctx.body = await User.find({
     name: new RegExp(ctx.query.q) }).limit(perPage).skip(page * perPage);
}
用户属性
使用话题引用替代部分用户属性
在models/users.js文件下修改
const mongoose = require('mongoose');

const {
     Schema, model } = mongoose;

const userSchema = new Schema({

    __v: {
     type: Number, select: false },
    name: {
     type: String, required: true },
    password: {
     type: String, required: true, select: false },
    avatar_url: {
     type: String }, // 用户头像
    gender: {
     type: String, enum: ['male', 'female'], default: 'male', required: true }, // enum 可枚举,性别
    headline: {
     type: String }, // 一句话简介
    locations: {
     type: [{
     type: Schema.Types.ObjectId, ref: 'Topic' }], select: false}, // 可枚举的字符串数组,居住地
    business: {
     type: Schema.Types.ObjectId, ref: 'Topic', select: false }, // 行业(公司)
    employments: {
      // 职业经历
        type: [{

            company: {
     type: Schema.Types.ObjectId, ref: 'Topic' },// 公司名称
            job: {
     type: Schema.Types.ObjectId, ref: 'Topic' }// 职业
        }],
        select: false
    },
    educations: {
     // 教育经历
        type: [{

            school: {
     type: Schema.Types.ObjectId, ref: 'Topic' },// 学校
            major: {
     type: Schema.Types.ObjectId, ref: 'Topic' },// 专业
            diploma: {
     type: Number, enum: [1, 2, 3, 4, 5] },// 学历
            entrance_year: {
     type: Number },// 入学年份
            graduation_year: {
     type: Number }// 毕业年份
        }],
        select: false
    },
    following: {
     // 关注的人
        type: [{

            type: Schema.Types.ObjectId, // 用户ID,这里属于特殊类型,必须用Schema提供的类型
            ref: 'user'
        }],
        select: false
    }
});

// user代表集合,导出的是一个类
module.exports = model('user', userSchema);
动态获取数据
在controllers/users.js文件下添加
// controllers/users.js
async findById (ctx) {

    const {
     fields = '' } = ctx.query;
    const selectFields = fields.split(';').filter(item => item).map(item => ' +'+item).join('');
    const populateStr = fields.split(';').filter(item => item).map(item => {

        if (item === 'employments') return 'employments.company employments.job';
        if (item === 'educations') return 'educations.school educations.major';
        return item;
    }).join(' ');

    const user = await User.findById(ctx.params.id).select(selectFields).populate(populateStr);
    if(!user) ctx.throw(404, '用户不存在');
    ctx.body = user;
}
关注话题接口
实现关注话题逻辑(用户-话题多对多关系)
实现用户关注话题,在models/users.js文件下添加
followingTopics: {
     // 关注的话题
    type: [{

        type: Schema.Types.ObjectId, // 话题ID
        ref: 'Topic'
    }],
    select: false
}
实现关注话题和取消关注话题,在controllers/users.js文件下添加
// 关注某个话题
async followTopic (ctx) {

    const me = await User.findById(ctx.state.user._id).select('+followingTopics');
    if(!me.followingTopics.map(id => id.toString()).includes(ctx.params.id)) {

        me.followingTopics.push(ctx.params.id);
        me.save();
    }
    ctx.status = 204;
}

// 取消关注某个话题
async unfollowTopic (ctx) {

    const me = await User.findById(ctx.state.user._id).select('+followingTopics');
    const index = me.followingTopics.map(id => id.toString()).indexOf(ctx.params.id);
    if(index > -1) {

        me.followingTopics.splice(index, 1);
        me.save();
    }
    ctx.status = 204;
}
检查id是否存在,在controllers/topics.js文件下添加
async checkTopicExist (ctx, next) {

    const topic = await Topic.findById(ctx.params.id);
    if(!topic) ctx.throw(404, '话题不存在');

    await next();
}
在routes/users.js文件下添加路由
const {
    followTopic,unfollowTopic} = require('../controllers/users');
const {
      checkTopicExist } = require('../controllers/topics');
如何获取当前话题下的关注者,在controllers/users.js文件下添加
async listFollowingTopics (ctx) {

    const user = await User.findById(ctx.params.id).select('+followingTopics').populate('followingTopics');
    console.log(user);
    if(!user) ctx.throw(404,'用户不存在');
    ctx.body = user.followingTopics;
}
在routers/users.js文件下添加路由
const {
    listFollowingTopics} = require('../controllers/users');

// 获取关注话题列表
router.get('/:id/listFollowingTopics', listFollowingTopics);
实现粉丝接口,在controllers/topics.js文件下添加
const User = require('../models/users')

// 话题粉丝
async listFollowers (ctx) {

    const users = await User.find({
     followingTopics: ctx.params.id }); // 查找followingTopics包含该话题id的用户
    ctx.body = users;
}
在routers/topics.js文件下添加路由并检查话题是否存在
const {
     listFollowers,checkTopicExist} = require('../controllers/topics');

// 获取当前话题下的粉丝
router.get('/:id/followers', checkTopicExist, listFollowers)
问题模块需求分析
功能点
- 问题的增删改查
- 用户的问题列表(用户 – 问题一对多关系)
- 话题的问题列表 + 问题的话题列表(话题 – 问题多对多关系)
- 关注/取消关注问题
用户 – 问题一对多关系设计与实现
实现增删改查接口
新建文件,在models/questions.js文件下添加
const mongoose = require('mongoose');

const {
     Schema, model } = mongoose;

const questionsSchema = new Schema({

    __v: {
     type: Number, select: false },
    title: {
     type: String, required: true },// 标题
    description: {
     type: String },// 描述
    questioner: {
     type: Schema.Types.ObjectId, ref: 'user', required: true, select: false }// 提问者
});

module.exports = model('Question', questionsSchema);
新建文件(控制器),在controllers/questions.js文件下添加
const Question = require('../models/questions');
class QuestionsCtl {

    async find (ctx) {

        const {
     per_page = 10 } = ctx.query;
        const page =  Math.max(+ctx.query.page, 1) - 1;
        const perPage = Math.max(+ctx.query.per_page, 1);
        const q = new RegExp(ctx.query.q)
        ctx.body = await Question.find( {
     $or: [{
     title: q }, {
     description: q }] }).limit(perPage).skip(page * perPage);
    }

    async findById (ctx) {

        const {
     fields = '' } = ctx.query;
        const selectFields = fields.split(';').filter(item => item).map(item => ' +'+item).join('');
        const question = await Question.findById(ctx.params.id).select(selectFields).populate('questioner');
        if(!question) ctx.throw(404, '问题不存在');
        ctx.body = question;
    }

    async create (ctx) {

        ctx.verifyParams({

            title: {
     type: 'string', required: true },
            description: {
     type: 'string', required: false }
        });
        const question = await new Question({
    ...ctx.request.body, questioner: ctx.state.user._id }).save();
        ctx.body = question;
    }

    async checkQuestioner (ctx, next) {

        const {
     question } = ctx.state;
        if (question.questioner.toString() !== ctx.state.user._id) ctx.throw(403, '没有权限');
        await next();
    }

    async update (ctx) {

        ctx.verifyParams({

            title: {
     type: 'string', required: false },
            description: {
     type: 'string', require: false }
        });
        await ctx.state.question.update(ctx.request.body);
        ctx.body = ctx.state.question;
    }

    async delete (ctx) {

        await Question.findByIdAndRemove(ctx.params.id);
        ctx.status = 204; // 没有内容,但是成功了
    }

    async checkQuestionExist (ctx, next) {

        const question = await Question.findById(ctx.params.id).select('+questioner');
        if(!question) ctx.throw(404, '问题不存在');
        ctx.state.question = question;
        await next();
    }
}

module.exports = new QuestionsCtl();
新建文件(注册路由),在routes/questions.js文件下添加
const jwt = require('koa-jwt');
const Router = require('koa-router');
const router = new Router({
    prefix: '/questions'});
const {
     find, findById, create, update, delete: del,checkQuestionExist, checkQuestioner } = require('../controllers/questions');

const {
     secret } = require('../../config');

// 认证中间件
const auth = jwt({
     secret });

// 获取问题列表
router.get('/', find);

// 增加问题
router.post('/', auth, create);

// 获取特定问题
router.get('/:id',checkQuestionExist, findById);

// 修改特定问题
router.patch('/:id', auth, checkQuestionExist, checkQuestioner, update);

// 删除问题
router.delete('/:id', auth, checkQuestionExist, checkQuestioner, del);

module.exports = router;
实现用户的问题列表接口
在controllers/users.js 文件下添加
const Question = require('../models/questions')

async listQuestions (ctx) {

    const questions = await Question.find({
     questioner: ctx.params.id });
    ctx.body = questions;
}
注册路由,在routes/users.js文件下添加
const {
    listQuestions} = require('../controllers/users');
// 获取问题列表
router.get('/:id/questions', checkUserExist, listQuestions)
话题 – 问题多对多关系设计与实现
这个问题必须设计为问题从属topics来做,因为一个问题最多只从属于某N个话题(一般不会超过10个),但反过来,一个话题下可以有无数个问题
实现问题的话题列表接口
在models/questions.js文件下添加
const questionsSchema = new Schema({

    __v: {
     type: Number, select: false },
    title: {
     type: String, required: true },// 标题
    description: {
     type: String },// 描述
    questioner: {
     type: Schema.Types.ObjectId, ref: 'user', required: true, select: false },// 提问者
    // 新增topics,需要自己从修改特定问题接口将数据自行加上测试
    topics: {

        type: [{
    type: Schema.Types.ObjectId, ref: 'Topic' }],
        select: false
    }
});
在controllers/questions.js文件下添加
async findById (ctx) {

    const {
     fields = '' } = ctx.query;
    const selectFields = fields.split(';').filter(item => item).map(item => ' +'+item).join('');
    // 新增topics填充
    const question = await Question.findById(ctx.params.id).select(selectFields).populate('questioner topics');
    if(!question) ctx.throw(404, '问题不存在');
    ctx.body = question;
}
实现话题的问题列表接口
在controllers/topics.js文件下写一个控制器
const Question = require('../models/questions')

async listQuestions (ctx) {

    const questions = await Question.find({
     topics: ctx.params.id });
    ctx.body = questions;
}
在routers/topics.js文件下注册路由
const {
    listQuestions} = require('../controllers/topics');
//问题的话题接口
router.get('/:id/questions', checkTopicExist, listQuestions)
答案模块需求分析
功能点
- 答案的增删改查
- 问题-答案/用户 - 答案一对多
- 赞/踩答案
- 收藏答案
问题-答案模块二级嵌套的增删改查接口
设计数据库 Schema
新建文件,在models/answers.js文件下添加
const mongoose = require('mongoose');

const {
     Schema, model } = mongoose;

const AnswerSchema = new Schema({

    __v: {
     type: Number, select: false },
    content: {
     type: String, required: true },// 内容
    answerer: {
     type: Schema.Types.ObjectId, ref: 'user', required: true, select: false },// 回答者
    questionId: {
     type: String, select: true,required:true }// 从属答案
});

module.exports = model('Answer', AnswerSchema);
实现增删改查接口
新建文件(控制器),在controllers/answers.js文件下添加
const Answer = require('../models/answers');

class AnswersCtl {

    async find (ctx) {

        const {
     per_page = 10 } = ctx.query;
        const page =  Math.max(+ctx.query.page, 1) - 1;
        const perPage = Math.max(+ctx.query.per_page, 1);
        const q = new RegExp(ctx.query.q);
        ctx.body = await Answer
            .find( {
     content: q, questionId: ctx.params.questionId })
            .limit(perPage).skip(page * perPage);
    }

    async checkAnswerExist (ctx, next) {

        const answer = await Answer.findById(ctx.params.id).select('+answerer');
        if(!answer || answer.questionId !== ctx.params.questionId) ctx.throw(404, '答案不存在');
        ctx.state.answer = answer;
        await next();
    }

    async findById (ctx) {

        const {
     fields = '' } = ctx.query;
        const selectFields = fields.split(';').filter(item => item).map(item => ' +'+item).join('');
        const answer = await Answer.findById(ctx.params.id).select(selectFields).populate('answerer');
        if(!answer) ctx.throw(404, '答案不存在');
        ctx.body = answer;
    }

    async create (ctx) {

        ctx.verifyParams({

            content: {
     type: 'string', required: true }
        });
        const answerer = ctx.state.user._id;
        const {
     questionId } = ctx.params;
        const answer = await new Answer({
    ...ctx.request.body, answerer, questionId }).save();
        ctx.body = answer;
    }

    async checkAnswerer (ctx, next) {

        const {
     answer } = ctx.state;
        if (answer.answerer.toString() !== ctx.state.user._id) ctx.throw(403, '没有权限');
        await next();
    }

    async update (ctx) {

        ctx.verifyParams({

            content: {
     type: 'string', required: false }
        });
        await ctx.state.answer.update(ctx.request.body);
        ctx.body = ctx.state.answer;
    }

    async delete (ctx) {

        await Answer.findByIdAndRemove(ctx.params.id);
        ctx.status = 204; // 没有内容,但是成功了
    }

}

module.exports = new AnswersCtl();
新建文件(注册路由),在routes/answers.js文件下添加
const jwt = require('koa-jwt');
const Router = require('koa-router');
// 二级嵌套
const router = new Router({
    prefix: '/questions/:questionId/answers'});
const {
     find, findById, create, update, delete: del,checkAnswerExist, checkAnswerer } = require('../controllers/answers');

const {
     secret } = require('../../config');

// 认证中间件
const auth = jwt({
     secret });

// 获取答案列表
router.get('/', find);

// 增加答案
router.post('/', auth, create);

// 获取特定答案
router.get('/:id',checkAnswerExist, findById);

// 修改特定答案
router.patch('/:id', auth, checkAnswerExist, checkAnswerer, update);

// 删除答案
router.delete('/:id', auth, checkAnswerExist, checkAnswerer, del);

module.exports = router;
互斥关系的赞/踩答案接口设计与实现
设计数据库 Schema
在models/users.js文件下添加用户踩/赞的属性
const userSchema = new Schema({

    likingAnswers: {

        type: [{

            type: Schema.Types.ObjectId, // 答案ID
            ref: 'Answer'
        }],
        select: false
    },
    dislikingAnswers: {

        type: [{

            type: Schema.Types.ObjectId, // 答案ID
            ref: 'Answer'
        }],
        select: false
    }
});
修改用户赞/踩投票数,在models/answers.js文件下添加
const AnswerSchema = new Schema({

    voteCount: {
     type: Number, required: true, default: 0 }// 投票数
});
实现接口
在controllers/users.js文件下添加
const Answer = require('../models/answers')

async listLikingAnswers (ctx) {

    const user = await User.findById(ctx.params.id).select('+likingAnswers').populate('likingAnswers');

    if(!user) ctx.throw(404, '用户不存在');
    ctx.body = user.likingAnswers;
}

async likeAnswer (ctx, next) {

    const me = await User.findById(ctx.state.user._id).select('+likingAnswers');
    if(!me.likingAnswers.map(id => id.toString()).includes(ctx.params.id)) {

        me.likingAnswers.push(ctx.params.id);
        me.save();
        // 赞同数加1
        await Answer.findByIdAndUpdate(ctx.params.id, {
     $inc: {
     voteCount: 1 } });
    }
    ctx.status = 204;
    await next();
}

async unlikeAnswer (ctx) {

    const me = await User.findById(ctx.state.user._id).select('+likingAnswers');
    const index = me.likingAnswers.map(id => id.toString()).indexOf(ctx.params.id);
    if(index > -1) {

        me.likingAnswers.splice(index, 1);
        me.save();
        // 赞同数减1
        await Answer.findByIdAndUpdate(ctx.params.id, {
     $inc: {
     voteCount: -1 } });
    }
    ctx.status = 204;
}

// 答案不认同列表(踩)
async listDisLikingAnswers (ctx) {

    const user = await User.findById(ctx.params.id).select('+dislikingAnswers').populate('dislikingAnswers');

    if(!user) ctx.throw(404, '用户不存在');
    ctx.body = user.dislikingAnswers;
}

async dislikeAnswer (ctx, next) {

    const me = await User.findById(ctx.state.user._id).select('+dislikingAnswers');
    if(!me.dislikingAnswers.map(id => id.toString()).includes(ctx.params.id)) {

        me.dislikingAnswers.push(ctx.params.id);
        me.save();
    }
    ctx.status = 204;
    await next();
}

async undislikeAnswer (ctx) {

    const me = await User.findById(ctx.state.user._id).select('+dislikingAnswers');
    const index = me.dislikingAnswers.map(id => id.toString()).indexOf(ctx.params.id);
    if(index > -1) {

        me.dislikingAnswers.splice(index, 1);
        me.save();
    }
    ctx.status = 204;
}
在router/users.js文件下导入路由
const {

    listLikingAnswers,likeAnswer,
    undislikeAnswer,unlikeAnswer,
    listDisLikingAnswers,dislikeAnswer
} = require('../controllers/users');

// 获取喜欢的答案列表
router.get('/:id/likingAnswers', listLikingAnswers);

// 点赞答案
router.put('/likingAnswers/:id', auth, checkAnswerExist, likeAnswer, undislikeAnswer);

// 取消点赞答案
router.delete('/likingAnswers/:id', auth, unlikeAnswer);

// 获取踩的答案列表
router.get('/:id/dislikingAnswers', listDisLikingAnswers);

// 踩答案
router.put('/dislikingAnswers/:id', auth, dislikeAnswer, unlikeAnswer);

// 取消踩答案
router.delete('/dislikingAnswers/:id', auth, undislikeAnswer);
在controllers/answers.js文件下判答案是否存在中间件
async checkAnswerExist (ctx, next) {

    const answer = await Answer.findById(ctx.params.id).select('+answerer');
    if (!answer) ctx.throw(404, '答案不存在');
    // 只有删改查答案的时候才检查此逻辑,赞和踩答案不检查
    if(ctx.params.questionId && answer.questionId !== ctx.params.questionId) ctx.throw(404, '该问题下没有此答案');
    ctx.state.answer = answer;
    await next();
}
在router/users.js文件下导入路由
const {
      checkAnswerExist } = require('../controllers/answers');

// 获取喜欢的答案列表
router.get('/:id/likingAnswers', listLikingAnswers);

// 点赞答案
router.put('/likingAnswers/:id', auth, checkAnswerExist, likeAnswer, undislikeAnswer);

// 取消点赞答案
router.delete('/likingAnswers/:id', auth, checkAnswerExist, unlikeAnswer);

// 获取踩的答案列表
router.get('/:id/dislikingAnswers', listDisLikingAnswers);

// 踩答案
router.put('/dislikingAnswers/:id', auth, checkAnswerExist, dislikeAnswer, unlikeAnswer);

// 取消踩答案
router.delete('/dislikingAnswers/:id', auth, checkAnswerExist, undislikeAnswer);
收藏答案接口
设计数据库Schema
在models/users.js文件下添加用户收藏的属性
const userSchema = new Schema({

    collectingAnswers: {
      // 收藏答案
        type: [{

            type: Schema.Types.ObjectId, // 答案ID
            ref: 'Answer'
        }],
        select: false
    }
});
实现接口
在controllers/users.js文件下添加
async listCollectAnswers (ctx) {

    const user = await User.findById(ctx.params.id).select('+collectingAnswers').populate('collectingAnswers');

    if(!user) ctx.throw(404, '用户不存在');
    ctx.body = user.collectingAnswers;
}

async collectAnswer (ctx, next) {

    const me = await User.findById(ctx.state.user._id).select('+collectingAnswers');
    if(!me.collectingAnswers.map(id => id.toString()).includes(ctx.params.id)) {

        me.collectingAnswers.push(ctx.params.id);
        me.save();
    }
    ctx.status = 204;
    await next();
}

async uncollectAnswer (ctx) {

    const me = await User.findById(ctx.state.user._id).select('+collectingAnswers');
    const index = me.collectingAnswers.map(id => id.toString()).indexOf(ctx.params.id);
    if(index > -1) {

        me.collectingAnswers.splice(index, 1);
        me.save();
    }
    ctx.status = 204;
}
在router/users.js文件下添加
const {
    listCollectAnswers,collectAnswer,uncollectAnswer,
} = require('../controllers/users');

// 获取收藏答案列表
router.get('/:id/collectAnswers', listCollectAnswers);

// 收藏答案
router.put('/collectAnswers/:id', auth, checkAnswerExist, collectAnswer);

// 取消收藏答案
router.delete('/collectAnswers/:id', auth, checkAnswerExist, uncollectAnswer);
评论模块需求分析
功能点
- 评论的增删改查
- 答案 - 评论/问题 - 评论/用户 - 评论一对多
- 一级评论与二级评论
- 赞/踩评论(重复功能不实现)
问题 - 答案 - 评论 模块三级嵌套的增删改查接口
设计数据库 Schema
新建文件,在models/comments.js文件下添加
const mongoose = require('mongoose');

const {
     Schema, model } = mongoose;

const commentSchema = new Schema({

    __v: {
     type: Number, select: false },
    content: {
     type: String, required: true },// 内容
    commentator: {
     type: Schema.Types.ObjectId, ref: 'user', required: true, select: false },// 评论人
    questionId: {
     type: String, select: true },// 问题id
    answerId: {
     type: String, select: true }// 回答id
});

module.exports = model('Comment', commentSchema);
实现增删改查接口
新建文件(控制器),在controllers/comments.js文件下添加
const Comment = require('../models/comments');

class CommentsCtl {

    async find (ctx) {

        const {
     per_page = 10 } = ctx.query;
        const page =  Math.max(+ctx.query.page, 1) - 1;
        const perPage = Math.max(+ctx.query.per_page, 1);
        const q = new RegExp(ctx.query.q);
        const {
     questionId, answerId } = ctx.params;
        ctx.body = await Comment
            .find( {
     content: q, questionId, answerId })
            .limit(perPage).skip(page * perPage)
            .populate('commentator');
    }

    async checkCommentExist (ctx, next) {

        const comment = await Comment.findById(ctx.params.id).select('+commentator');
        if (!comment) ctx.throw(404, '评论不存在');
        if(ctx.params.questionId && comment.questionId !== ctx.params.questionId) ctx.throw(404, '该问题下没有此评论');
        if(ctx.params.answerId && comment.answerId !== ctx.params.answerId) ctx.throw(404, '该答案下没有此评论');

        ctx.state.comment = comment;
        await next();
    }

    async findById (ctx) {

        const {
     fields = '' } = ctx.query;
        const selectFields = fields.split(';').filter(item => item).map(item => ' +'+item).join('');
        const comment = await Comment.findById(ctx.params.id).select(selectFields).populate('commentator');
        if(!comment) ctx.throw(404, '评论不存在');
        ctx.body = comment;
    }

    async create (ctx) {

        ctx.verifyParams({

            content: {
     type: 'string', required: true }
        });

        const commentator = ctx.state.user._id;
        const {
     questionId, answerId } = ctx.params;
        const comment = await new Comment({
    ...ctx.request.body, commentator, questionId, answerId }).save();
        ctx.body = comment;
    }

    async checkCommentator (ctx, next) {

        const {
     comment } = ctx.state;
        if (comment.commentator.toString() !== ctx.state.user._id) ctx.throw(403, '没有权限');
        await next();
    }

    async update (ctx) {

        ctx.verifyParams({

            content: {
     type: 'string', required: false }
        });

        await ctx.state.comment.update(ctx.request.body);
        ctx.body = ctx.state.comment;
    }

    async delete (ctx) {

        await Comment.findByIdAndRemove(ctx.params.id);
        ctx.status = 204; // 没有内容,但是成功了
    }

}

module.exports = new CommentsCtl();
新建文件(注册路由),在routes/comments.js文件下添加
const jwt = require('koa-jwt');
const Router = require('koa-router');
const router = new Router({
    prefix: '/questions/:questionId/answers/:answerId/comments'});
const {
     find, findById, create, update, delete: del,checkCommentExist, checkCommentator } = require('../controllers/comments');

const {
     secret } = require('../../config');

// 认证中间件
const auth = jwt({
     secret });

// 获取评论列表
router.get('/', find);

// 增加评论
router.post('/', auth, create);

// 获取特定评论
router.get('/:id',checkCommentExist, findById);

// 修改特定评论
router.patch('/:id', auth, checkCommentExist, checkCommentator, update);

// 删除评论
router.delete('/:id', auth, checkCommentExist, checkCommentator, del);

module.exports = router;
一级评论与二级评论接口的设计与实现
设计数据库Schema
在models/comments.js文件下添加属性
const commentSchema = new Schema({

    rootCommentId: {
     type: String },// 数据库
    replyTo: {
     type: Schema.Types.ObjectId, ref: 'user' }// 数据库
});
实现接口
在controllers/comments.js文件下添加
// 新增rootCommentId,有该Id证明是二级评论,
async find (ctx) {

    const {
     per_page = 10 } = ctx.query;
    const page =  Math.max(+ctx.query.page, 1) - 1;
    const perPage = Math.max(+ctx.query.per_page, 1);
    const q = new RegExp(ctx.query.q);
    const {
     questionId, answerId } = ctx.params;
    const {
     rootomment } = ctx.query;
    ctx.body = await Comment.find( {
     content: q, questionId, answerId, rootomment }).limit(perPage).skip(page * perPage).populate('commentator replyTo'); // limit: 返回多少数量,skip:跳过多少数量
    }

// 新增两个验证 rootCommentId 和 replyTo
async create (ctx) {

    ctx.verifyParams({

        content: {
     type: 'string', required: true },
        rootCommentId: {
     type: 'string', required: false },
        replyTo: {
     type: 'string', required: false }
    });
    const commentator = ctx.state.user._id;
    const {
     questionId, answerId } = ctx.params;
    const comment = await new Comment({
    ...ctx.request.body, commentator, questionId, answerId }).save();
    ctx.body = comment;
}

// 更新的时候只能更新内容,不能像原来那样直接把内容给替换掉,否则二级评论会覆盖一级评论
async update (ctx) {

    ctx.verifyParams({

        content: {
     type: 'string', required: false }
    });
    const {
     content } = ctx.request.body;
    await ctx.state.comment.update({
    content});
    ctx.body = ctx.state.comment;
}
添加日期
设计数据库Schema
在models文件夹下的所有文件添加时间戳
{
    timestamps: true}// 时间戳
智能推荐
5个超厉害的资源搜索网站,每一款都可以让你的资源满满!_最全资源搜索引擎-程序员宅基地
文章浏览阅读1.6w次,点赞8次,收藏41次。生活中我们无时不刻不都要在网站搜索资源,但就是缺少一个趁手的资源搜索网站,如果有一个比较好的资源搜索网站可以帮助我们节省一大半时间!今天小编在这里为大家分享5款超厉害的资源搜索网站,每一款都可以让你的资源丰富精彩!网盘传奇一款最有效的网盘资源搜索网站你还在为找网站里面的资源而烦恼找不到什么合适的工具而烦恼吗?这款网站传奇网站汇聚了4853w个资源,并且它每一天都会持续更新资源;..._最全资源搜索引擎
Book类的设计(Java)_6-1 book类的设计java-程序员宅基地
文章浏览阅读4.5k次,点赞5次,收藏18次。阅读测试程序,设计一个Book类。函数接口定义:class Book{}该类有 四个私有属性 分别是 书籍名称、 价格、 作者、 出版年份,以及相应的set 与get方法;该类有一个含有四个参数的构造方法,这四个参数依次是 书籍名称、 价格、 作者、 出版年份 。裁判测试程序样例:import java.util.*;public class Main { public static void main(String[] args) { List <Book>_6-1 book类的设计java
基于微信小程序的校园导航小程序设计与实现_校园导航微信小程序系统的设计与实现-程序员宅基地
文章浏览阅读613次,点赞28次,收藏27次。相比于以前的传统手工管理方式,智能化的管理方式可以大幅降低学校的运营人员成本,实现了校园导航的标准化、制度化、程序化的管理,有效地防止了校园导航的随意管理,提高了信息的处理速度和精确度,能够及时、准确地查询和修正建筑速看等信息。课题主要采用微信小程序、SpringBoot架构技术,前端以小程序页面呈现给学生,结合后台java语言使页面更加完善,后台使用MySQL数据库进行数据存储。微信小程序主要包括学生信息、校园简介、建筑速看、系统信息等功能,从而实现智能化的管理方式,提高工作效率。
有状态和无状态登录
传统上用户登陆状态会以 Session 的形式保存在服务器上,而 Session ID 则保存在前端的 Cookie 中;而使用 JWT 以后,用户的认证信息将会以 Token 的形式保存在前端,服务器不需要保存任何的用户状态,这也就是为什么 JWT 被称为无状态登陆的原因,无状态登陆最大的优势就是完美支持分布式部署,可以使用一个 Token 发送给不同的服务器,而所有的服务器都会返回同样的结果。有状态和无状态最大的区别就是服务端会不会保存客户端的信息。
九大角度全方位对比Android、iOS开发_ios 开发角度-程序员宅基地
文章浏览阅读784次。发表于10小时前| 2674次阅读| 来源TechCrunch| 19 条评论| 作者Jon EvansiOSAndroid应用开发产品编程语言JavaObjective-C摘要:即便Android市场份额已经超过80%,对于开发者来说,使用哪一个平台做开发仍然很难选择。本文从开发环境、配置、UX设计、语言、API、网络、分享、碎片化、发布等九个方面把Android和iOS_ios 开发角度
搜索引擎的发展历史
搜索引擎的发展历史可以追溯到20世纪90年代初,随着互联网的快速发展和信息量的急剧增加,人们开始感受到了获取和管理信息的挑战。这些阶段展示了搜索引擎在技术和商业模式上的不断演进,以满足用户对信息获取的不断增长的需求。
随便推点
控制对象的特性_控制对象特性-程序员宅基地
文章浏览阅读990次。对象特性是指控制对象的输出参数和输入参数之间的相互作用规律。放大系数K描述控制对象特性的静态特性参数。它的意义是:输出量的变化量和输入量的变化量之比。时间常数T当输入量发生变化后,所引起输出量变化的快慢。(动态参数) ..._控制对象特性
FRP搭建内网穿透(亲测有效)_locyanfrp-程序员宅基地
文章浏览阅读5.7w次,点赞50次,收藏276次。FRP搭建内网穿透1.概述:frp可以通过有公网IP的的服务器将内网的主机暴露给互联网,从而实现通过外网能直接访问到内网主机;frp有服务端和客户端,服务端需要装在有公网ip的服务器上,客户端装在内网主机上。2.简单的图解:3.准备工作:1.一个域名(www.test.xyz)2.一台有公网IP的服务器(阿里云、腾讯云等都行)3.一台内网主机4.下载frp,选择适合的版本下载解压如下:我这里服务器端和客户端都放在了/usr/local/frp/目录下4.执行命令# 服务器端给执_locyanfrp
UVA 12534 - Binary Matrix 2 (网络流‘最小费用最大流’ZKW)_uva12534-程序员宅基地
文章浏览阅读687次。题目:http://acm.hust.edu.cn/vjudge/contest/view.action?cid=93745#problem/A题意:给出r*c的01矩阵,可以翻转格子使得0表成1,1变成0,求出最小的步数使得每一行中1的个数相等,每一列中1的个数相等。思路:网络流。容量可以保证每一行和每一列的1的个数相等,费用可以算出最小步数。行向列建边,如果该格子是_uva12534
免费SSL证书_csdn alphassl免费申请-程序员宅基地
文章浏览阅读504次。1、Let's Encrypt 90天,支持泛域名2、Buypass:https://www.buypass.com/ssl/resources/go-ssl-technical-specification6个月,单域名3、AlwaysOnSLL:https://alwaysonssl.com/ 1年,单域名 可参考蜗牛(wn789)4、TrustAsia5、Alpha..._csdn alphassl免费申请
测试算法的性能(以选择排序为例)_算法性能测试-程序员宅基地
文章浏览阅读1.6k次。测试算法的性能 很多时候我们需要对算法的性能进行测试,最简单的方式是看算法在特定的数据集上的执行时间,简单的测试算法性能的函数实现见testSort()。【思想】:用clock_t计算某排序算法所需的时间,(endTime - startTime)/ CLOCKS_PER_SEC来表示执行了多少秒。【关于宏CLOCKS_PER_SEC】:以下摘自百度百科,“CLOCKS_PE_算法性能测试
Lane Detection_lanedetectionlite-程序员宅基地
文章浏览阅读1.2k次。fromhttps://towardsdatascience.com/finding-lane-lines-simple-pipeline-for-lane-detection-d02b62e7572bIdentifying lanes of the road is very common task that human driver performs. This is important ..._lanedetectionlite